Introduction to Gaming on Windows
Windows offers a robust platform for gaming, combining versatility with the power to run a wide range of games. From high-end AAA titles to indie games, Windows can handle diverse gaming needs. However, to get the most out of gaming on this platform, optimization is key.
Optimization in the context of gaming on Windows isn’t just about getting the game to run; it’s about enhancing the overall experience. By tweaking settings, managing resources, and using the right tools, you can significantly improve game performance and stability. This involves balancing system resources, fine-tuning graphics settings, and ensuring that your hardware is working at its peak capacity.
As games become more demanding, the need to optimize Windows for gaming grows. Whether it’s to achieve smoother frame rates, reduce lag, or just make sure the game runs more efficiently, optimizing your Windows system can make a notable difference. This is especially true for those who might not have the latest hardware but still want to enjoy a good gaming experience.
Turning Off Xbox Game Bar and Overlays
The Xbox Game Bar and other similar overlays can significantly impact your gaming performance on Windows. While these features offer quick access to gaming functionalities and social features, they can consume valuable system resources, potentially leading to lower frame rates and a less responsive gaming experience.
Here are the steps to disable the Xbox Game Bar:
- Access Settings: Press the Windows key, type “Settings,” and hit Enter.
- Navigate to Gaming: In the Settings menu, find and click on ‘Gaming’.
- Disable Game Bar: Under the ‘Game Bar’ tab, toggle off the option that says “Record game clips, screenshots, and broadcast using Game bar.”
Similarly, if you use other gaming overlays like those from Discord or Steam, consider disabling them while playing games. These overlays, while useful for communication and accessing in-game features, can also use up system resources.
It’s worth noting that not all systems will see a dramatic improvement in performance by just turning off these features, but for systems where every bit of resource counts, this can make a noticeable difference.
Managing Background Processes for Smoother Gameplay
Effective management of background processes is crucial for optimizing gaming performance on Windows. Many programs and services run in the background, consuming system resources that could otherwise be allocated to your game. By identifying and closing these resource-heavy applications, you can free up memory and CPU capacity, leading to smoother gameplay.
Here’s how to manage background processes:
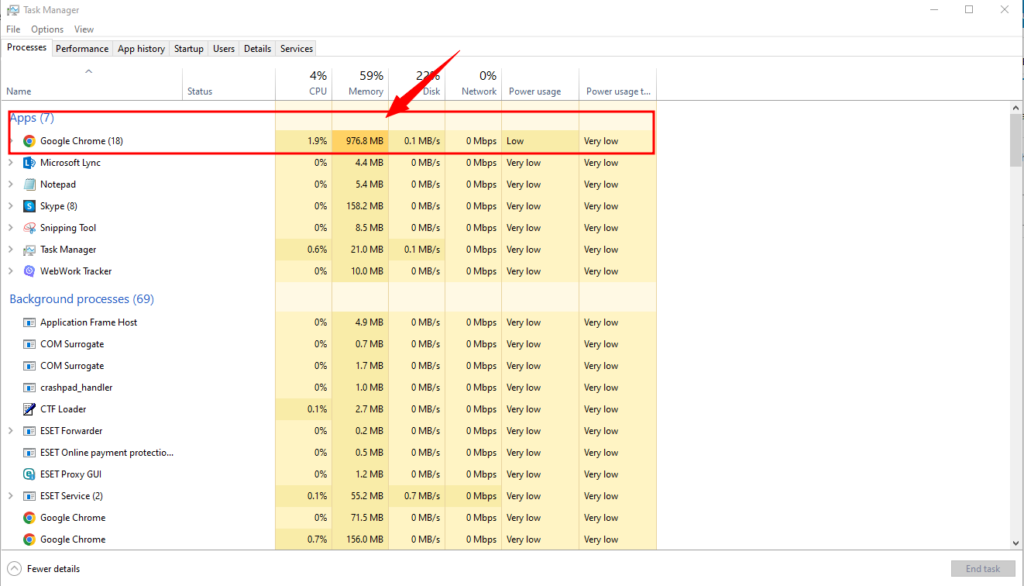
- Open Task Manager: Press Ctrl+Shift+Esc to open the Task Manager.
- Identify Resource-Intensive Processes: Look for applications that are using a high percentage of CPU or memory.
- Close Unnecessary Processes: Right-click on any non-essential process and select ‘End Task’ to close it.
Be cautious while doing this; closing essential system processes can affect the stability of your system. If you’re unsure about a process, it’s best to leave it running.
For a more automated approach, consider using dedicated tools that can help manage these processes. Some gaming optimization software can automatically adjust which processes are running while you game, ensuring that maximum resources are available for your gaming session.
Using Higher Power Plans for Improved Performance
Selecting the right power plan in Windows can have a significant impact on your gaming performance. Windows offers different power plans, each designed to balance energy use and performance. For gaming, using a higher power plan can enhance performance by allowing the computer to use more resources.
Here’s how to change your power plan:
- Open Control Panel: Press the Windows key, type “Control Panel,” and press Enter.
- Go to Power Options: Click on “Hardware and Sound,” then select “Power Options.”
- Choose High Performance: Select the ‘High Performance’ power plan. This option allows your PC to use more power, but provides better performance.
Keep in mind, the ‘High Performance’ plan may consume more energy and can lead to increased heat generation, so it’s important to have good cooling solutions in place, especially for intense gaming sessions or on gaming laptops.
Optimizing Mouse Settings for Precision Gaming
Mouse precision is crucial in gaming, and Windows settings can influence it. By default, Windows has a setting called “Enhance Pointer Precision” enabled, which is a form of mouse acceleration. In gaming, where precise aiming and quick reactions matter, mouse acceleration can be detrimental.
Here’s how to disable Enhance Pointer Precision:
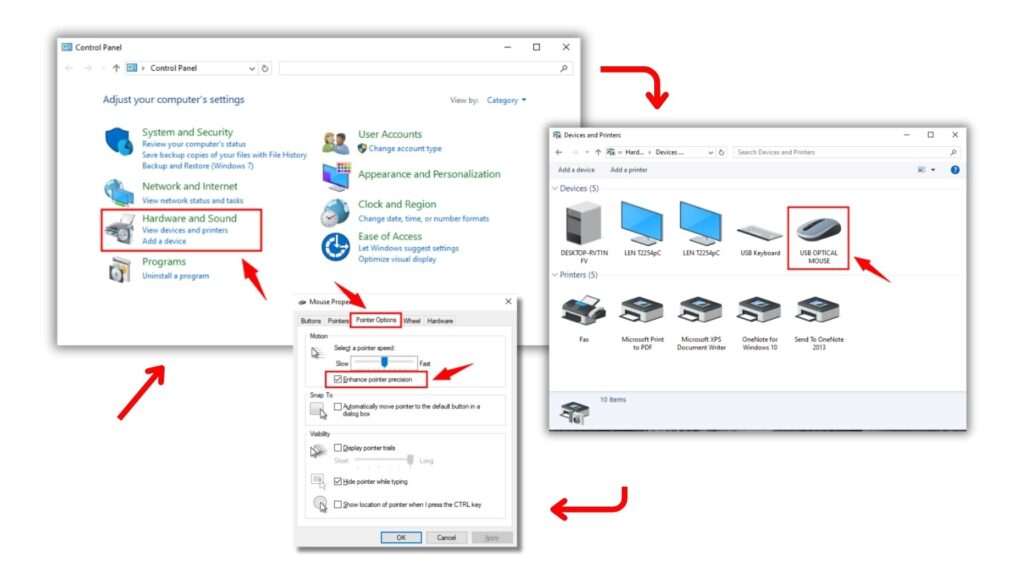
- Access Control Panel: Press Windows + S, search for “Control Panel,” and open it.
- Navigate to Mouse Settings: Select “Hardware and Sound,” then click on “Mouse” under the “Devices and printers” section.
- Disable Enhance Pointer Precision: In the Pointer options tab, uncheck the box next to “Enhance pointer precision.”
This simple adjustment ensures that your mouse movements are consistent, allowing for precise aiming and smoother gaming. It’s a fundamental step in optimizing your Windows system for gaming.
Leveraging Game Mode and Game Optimizers
Windows 11 and Windows 10 include a feature known as Game Mode, designed to allocate system resources for an enhanced gaming experience. However, its impact can vary, and in some cases, it might not yield the desired results. Still, enabling Game Mode is generally recommended, especially for less resource-intensive systems.
To enable Game Mode:
- Press Windows + S and search for “Settings.”
- Select “Gaming” and then “Game mode.”
- Toggle the slider to turn Game Mode on.
For those seeking alternatives or additional optimization, third-party tools like Razer Cortex offer performance-boosting benefits without potential drawbacks. These tools can fine-tune system settings to further improve gaming performance, complementing Game Mode for a smoother gaming experience.
Managing Windows Updates for Uninterrupted Gaming
While it’s essential to keep your Windows operating system up to date for security reasons, automatic updates can be a nuisance during gaming sessions. They may interrupt gameplay or cause performance issues. Fortunately, Windows allows users to pause automatic updates temporarily, providing a balance between security and gaming performance.
To pause automatic Windows updates:
- Press Windows + S to search for “Settings.”
- Select “Windows Update” from the left menu.
- Under “More options,” choose “Pause updates.”
During this pause, it’s advisable to manually check for updates periodically, as new drivers and system updates can improve gaming performance. This approach ensures that updates won’t disrupt your gaming sessions.
Pulling in Background Downloads in Steam
Steam, one of the most popular gaming platforms on Windows, has a feature that can impact your gaming performance—automatic updates. Steam is known for automatically updating games in the background, which can consume valuable resources and even install updates while you’re playing.
Here’s how to manage background downloads in Steam:
- Open Steam and select “Steam” in the upper-left corner.
- Choose “Settings.”
- In the menu, go to the “Downloads” tab.
- Uncheck the “Allow downloads during gameplay” option.
- Check the “Only auto-update games between” box and select a time when you’re not using your computer.
Additionally, you can turn off automatic updates for individual games, ensuring they won’t interrupt your gaming experience. This control over updates can significantly improve gaming performance.
Configure your GPU Software for Maximum Output
Both AMD and Nvidia graphics cards come with software that can significantly impact gaming performance. Optimizing the settings within these applications can enhance your gaming experience. If you own one of the best graphics cards, rest assured that they are supported by equally impressive software.
Here are the steps to configure your GPU software for optimal gaming performance:
- For Nvidia GPUs, follow our guide on the best Nvidia Control Panel settings.
- Select “Manage 3D settings” and ensure you’re on the Global settings tab.
- Set “Power management mode” to “Prefer maximum performance.”
- Adjust other settings as needed to optimize your graphics card’s performance.
Configuring your GPU software settings can make a substantial difference in gaming visuals and frame rates, ensuring you get the most out of your hardware.
Conclusion
Optimizing your Windows system for gaming doesn’t require technical expertise. By following these straightforward steps, you can enhance your gaming experience significantly. Disabling overlays and background processes, selecting the right power plan, managing mouse settings, leveraging Game Mode and optimizers, handling Windows updates, and configuring GPU software are all accessible methods to boost gaming performance. Remember that a combination of these optimizations can lead to the best results, ensuring that your Windows PC is ready for a seamless gaming experience. Enjoy your games to the fullest by maximizing your system’s potential.