
This tutorial will present you the basic file operations in C#, like creating a file, writing text to a file, opening / reading a file, retrieving file information, copying and moving a file and more...
In this tutorial we’re going to code in a C# Windows Application project, so start this project in the Microsoft Visual C# .NET environment.
Creating a file
As most of the tasks in C#, creating a file is really easy to accomplish, but – of course – you must know how.
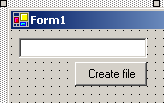
On the form created inside the project, add a TextBox and a Button (txtFileName and btnCreateFile).
Now let’s do the coding which is as easy as it was adding the controls, a two step process. Right click the form and choose View code so you can see the code.
First thing you should do is solve the namespace to System.IO, which is the namespace used for file operations (input / output).
using System.IO;Creating a text file
Now back on the form design, double click the button btnCreateFile and the Click event will be created, where you’ll use this:
private void btnCreateFile_Click(object sender, System.EventArgs e)

{

   File.CreateText(@txtFileName.Text);

}
The line inside the event creates a text file at the path specified in the TextBox. Note that the ‘@’ is used so that the \ (backslash) isn’t considered an escape character.
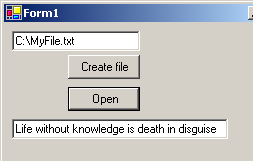
If you typed C:\MyFile.txt in the TextBox, File.CreateText will create a file named MyFile.txt in the root of C:.
The file can have any extension you want, not just txt or no extension at all, but consider that here we created a text file (see CreateText) and therefore the file is written using ASCII characters.
Creating a binary file
A binary file is created the same way, just that instead of using CreateText() you use Create(). At first you won’t notice any difference between the text file and the binary file but it matters a lot because it is stored differently. You use the text file for storing (doh) text and the binary file for storing.
Writing text to a file
Let’s not create an empty file this time, let’s write something into the file when it is created. First we need a StreamWriter so declare one in Form1.cs:
private System.IO.StreamWriter SW;Now in the Click event of btnCreateFile use the following lines:
private void btnCreateFile_Click(object sender, System.EventArgs e)

{

   // Create the file

   SW = File.CreateText(@txtFileName.Text);

   // Write using the StreamWriter

   SW.WriteLine("Life without knowledge is death in disguise");

   // Close the writer

   SW.Close();

}
It’s straightforward what is going on here, with the help of the StreamWriter we write a string to the file. Hence, type a path for the file again in the TextBox and press the btnCreateFile button, this time not only it creates a file at the specified path but also adds the text inside SW.WriteLine(“”).
Opening and reading a text file
Now that we have the file created, let’s open it. On the same project, the same form (Form1) add a button btnOpenFile and a TextBox txtFileContent.
In the code, now. First we need to create a StreamReader and an int variable:
private System.IO.StreamReader SR;

private int FileChar;
Then doubleclick the button btnOpenFile to get the btnOpenFile_Click() event.
private void btnOpenFile_Click(object sender, System.EventArgs e)

{

   // Open the file

   SR = File.OpenText(@txtFileName.Text);

   // Loop trough each character in the file

   while((FileChar = SR.Read()) != -1)

   {

      // Show the current char

      //MessageBox.Show(Convert.ToChar(FileChar).ToString());


      // Display the text in the TextBox

      txtFileContent.Text += Convert.ToChar(FileChar);

   }

   // Close the reader

   SR.Close();

}
As you can see here, we loop trought the file for each character. SR.Read() moves to the next character every time, but when SR.Read() returns -1 (no character), the loop will end.
If you want to see how the loop is done, you can uncomment the line with the MessageBox and you’ll see each time SR.Read() passes to the next character.
The integer variable FileChar holds the current character. But why an integer and not a char, you ask? Because the characters are stored in ASCII and that’s also why we later convert it using Convert.ToChar().
Checking if a file exists
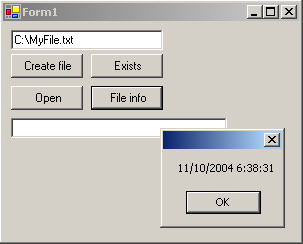
You’ll often have to check if a file exists at a specified path, so let’s see how it’s done. Create a new button on the form named btnFileExists and doubleclick it so you can get the Click event, where you’ll use the following:
private void btnOpenFile_Click(object sender, System.EventArgs e)

{

   if(File.Exists(@txtFileName.Text))

   {

   MessageBox.Show("It's there!");

   }

   else

   {

   MessageBox.Show("I can't find it...");

   }

}
Simple, we test using File.Exists() to see if the file specified in the path in txtFileName exists.
Maybe you noticed that if you type a path to an inexistent file in the TextBox and click the btnOpen button you’ll get an ugly error. Well that’s the case in which we can use File.Exists().
Retrieving file information
Getting file attributes like Read-only, Hidden, CreationTime, DateTime, LastAccessTime, LastWriteTime or the directory in which the file resides is really easy in .NET. They are all done using the FileInfo class. Let’s see an example.
In the code create a new instance of FileInfo:
private System.IO.FileInfo FI;Add a new button btnFileInfo and doubleclick it to get the Click event. Now that we’re at the event, check out the following code:
private void btnFileInfo_Click(object sender, System.EventArgs e)

{

   FI = new FileInfo(@txtFileName.Text);


   // Show in which directory the file resides

   MessageBox.Show(FI.DirectoryName.ToString());

   // Get the file's extension

   MessageBox.Show(FI.Extension.ToString());

   // When the file was last accessed

   MessageBox.Show(FI.LastAccessTime.ToString());

   // When the file suffered modifications

   MessageBox.Show(FI.LastWriteTime.ToString());


   if((FI.Attributes & FileAttributes.ReadOnly) != 0)

   {

      MessageBox.Show("Read-only");

   }

   if((FI.Attributes & FileAttributes.Hidden) != 0)

   {

      MessageBox.Show("Hidden");

   }

   if((FI.Attributes & FileAttributes.Archive) != 0)

   {

      MessageBox.Show("Archive");

   }

   if((FI.Attributes & FileAttributes.System) != 0)

   {

      MessageBox.Show("System");

   }

}
There are other attributes that we didn’t use in the code but you can easily figure them out thanks to IntelliSense.
Copying a file
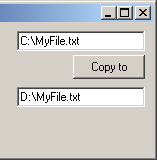
Let’s copy the MyFile.txt file from one place to another. Add to the form two TextBoxes – txtCopyFrom and txtCopyTo. Also add a button btnCopy. Doubleclick the newly created button and we now need to code the Click event.
private void btnCopy_Click(object sender, System.EventArgs e)

{

   File.Copy(txtCopyFrom.Text, txtCopyTo.Text, false);

}
Yes, it’s that simple, txtCopyFrom.Text is the source and txtCopyTo.Text is the destination path. False is set because we don’t want any file with the same name on the destination to be overwritten.
Moving a file
To finish our project, let’s add to the form two TextBoxes – txtMoveFrom and txtMoveTo – and a Button btnMove which you’ll doubleclick to get to the event:
private void btnMove_Click(object sender, System.EventArgs e)

{

   File.Move(txtMoveFrom.Text, txtMoveTo.Text);

}
Just as simple, but don’t forget that you shouldn’t implement just a line of code for doing file operations, like in this case. You also have to handle exceptions… for example if you try to move a file to a path where there’s a file with the same name you’ll get an ugly exception (actually they are all ugly).
There will probably be another tutorial following this one that handles more advanced file operations because this was just a superficial covering of the subject for those in a hurry and there’s much, much more to say about IO in .NET.


