This tutorial will teach you how to retrieve the http response from a server using C#. Learn how to get the content of a page, the header returned by the server, and how to pass different details to it, such as the referrer and User Agent.
 5 stars: Programming tutorial/source code has a rate higher than 4.5. 5 stars: Programming tutorial/source code has a rate higher than 4.5. |
There are many things you can do in the .NET Framework with the HttpWebResponse and HttpWebRequest objects, but probably the most exciting is making connections to webpages and retrieving their content. And this is what we’re going to do in this tutorial. We’re going to make a request to an URL for retrieving the content of an HTML page, and also we’re going to retrieve the headers returned by the server, while we’re at it. The headers return information such as the software that the server is running, the content type that’s being returned (jpg image, html text, etc.).
When we connect to the server, we also give him some information about ourself. We specify the referrer, which is normally the page where we came from before visiting the current URL, and the User Agent, which gives some information about the browser, the operating system and other things installed on it, such as the .NET Framework. With this application you can specify your own referrer URL and user agent, tricking the website to think you’re using whatever browser you want it to think.
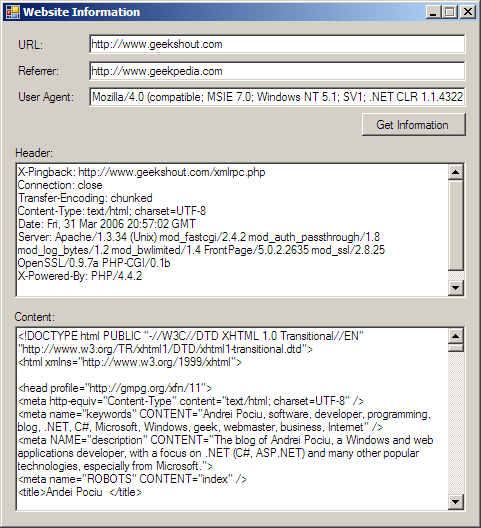
Start by creating a C# Windows application project. Add 5 textboxes to the form, one button and the additional labels so that the form looks like the one above. The first TextBox is named txtUrl, and it holds the URL of the page to which we want to connect and retrieve the content of. The second TextBox you should name txtReferrer – it contains the URL of the website that referred you to the page you’re visiting (in txtUrl). Since no one referred us to the page, and we entered the link manually in the txtUrl textbox, you can leave this blank. On the other hand, you can make the website think you’ve come from Microsoft.com, Google.com or wherever you want. The third TextBox is named txtUserAgent and will hold the UserAgent of the visitor’s browser. Since our application isn’t exactly a browser, we don’t have an user agent, but you can specify a compatible browser. I specified Windows Internet Explorer 7.0 by using Mozilla/4.0 (compatible; MSIE 7.0; Windows NT 5.1; SV1; .NET CLR 1.1.4322; .NET CLR 2.0.50215) in the User Agent TextBox. This gives more information about my system than just the browser I’m using. It tells I’m using Windows XP, and I have .NET Framework 1.1 and 2.0 installed. If you wish, you can change it to an Internet Explorer 6.0 User Agent string, and the website will think you’re using that browser.
The remaining two textboxes – txtHeader and txtContent – will be used to display the headers and the content retrieved from the URL.
The button is entitled btnGet, and you should now double click it to get to the Click event handler. But before typing our code in the event handler, we need to add a few namespaces and declare a few objects.
The two namespaces we’re going to use (along with the others added by Visual Studio) are System.Net and System.IO so add the following lines along with the other using directives:
using System.Net;
using System.IO;
There are three most important objects we’re going to use to make this application work, and they are HttpWebRequest for making a request to the web server, HttpWebResponse for getting the response from the web server, and Stream (from System.IO) since we’re going to get the response as a stream, which we need to buffer.
So let’s define these objects, right inside the class declaration, above the constructor:
HttpWebRequest wReq;
HttpWebResponse wResp;
Stream rStream;
Now we can move to the Click event handler that we created when btnGet was clicked. Inside it, use the code below. The comments help explain the code, and there’s more explanation going on at the bottom.
txtContent.Text = "";
txtHeader.Text = "";
// Place the web request to the server by specifying the URL
wReq = (HttpWebRequest)WebRequest.Create(txtUrl.Text);
// No need for a persistant connection
wReq.KeepAlive = false;
// The link that referred us to the URL
wReq.Referer = txtReferrer.Text;
// The user agent of the browser
wReq.UserAgent = txtUserAgent.Text;
// Get the response from the server
wResp = (HttpWebResponse)wReq.GetResponse();
// Display the header of the response
txtHeader.Text = wResp.Headers.ToString();

// Get a stream to read the body of the response
rStream = wResp.GetResponseStream();
// Needed for looping through the buffer
int bufCount = 0;
// Buffer in which we're going to store data coming from the server
byte[] byteBuf = new byte[1024];
// Loop as long as there's data in the buffer
do
{
   // Fill the buffer with data
   bufCount = rStream.Read(byteBuf, 0, byteBuf.Length);

   if (bufCount != 0)
   {
      // Transform the bytes into ASCII text and append to the textbox
      txtContent.AppendText(Encoding.ASCII.GetString(byteBuf, 0, bufCount));
   }
}
while (bufCount > 0);
First we are setting the two TextBoxes to an empty string, to remove any content they could already have. Then we place a web request to the server, asking it to give us the content of the URL we specify. This is not a connection that need to persist, we just retrieve the content and disconnect from the server, that’s why we specify KeepAlive = false. We set the referrer and UserAgent string to the values that were entered in the TextBoxes.
Now that the request was placed to the server, we start retrieving the server’s response, and before anything, we want to retrieve the headers. We can retrieve more than that at this time through properties such as ContentEncoding, LastModified, Cookies, ProtocolVersion, StatusCode, etc.
Moving on, we want to get the content of the page, but that’s not as simple as retrieving the header. The content is retrieved as a stream (a sequence of bytes), and for reading this stream, we need a Stream object (which we declared earlier), and a buffer to hold this data prior to it being displayed in the textbox. You can see that we create a buffer that’s 1024 bytes long. We can create a bigger one, 10,000 bytes if we wish, or one that’s only 8 bytes, but that will affect the performance of the application. As a matter of fact, try creating a buffer that’s 8 bytes, and run the application. You will notice that since we’re getting data in such small portions, the content will be retrieved slower.
We loop through the buffer each time, and each time we display the content from the buffer into the TextBox, we fill the buffer with new data from the server, until there’s none left, and the loop ends.
Also, on the line where we append the content of the buffer to the TextBox, we use the GetString() method to transform the buffer’s bytes into readable ASCII text.


