This is part II of the tutorial that teaches you how to connect to a SQL database from ASP .NET using SQL Authentication. This part shows you how to connect to the database using ASP .NET code and Visual Studio .NET's features.
This is part II of the tutorial named: Connecting to SQL from ASP .NET I
In the first part of the tutorial we dealed with the SQL database. Now we’re going to make the ASP .NET web application that will establish a connection to the database we created. We’re going to do it the Visual Studio way – as quick as possible with very few effort.
So fire up Visual Studio .NET and create a new ASP .NET Web Application – name it ‘SQLConnection’.
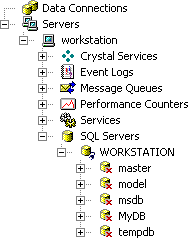
Do a Ctrl+Alt+S shortcut that brings the Server Explorer window. Browse through Server > YourComputerName > SQL Servers > YourInstanceName.
| NOTE If you cannot see the instance name (in the picture on the left the instance name is WORKSTATION – the second, written all in uppercase), right click SQL Servers and choose Register SQL Server Instance. Leave the default text in the fields and a new instance will be created using your computer’s name. |
We are interested in the MyDB database, and if you click the [+] sign next to it you can see that it is freely browseable. It can be browsed because Visual Studio authenticates using Windows NT Integrated Security but one of the purposes of this tutorial is to connect to it using SQL Authentication (in fact, that’s why we created that SQL login in the first tutorial).
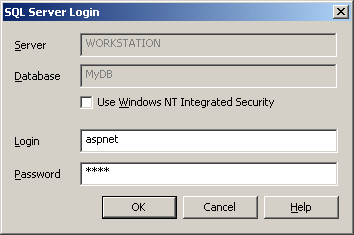
We can simply connect to MyDB using different authentication: right click the database name and choose Change Login… uncheck the checkbox named ‘Use Windows NT Integrated Security’ and in the Login field enter the login name that we created in the first tutorial (aspnet) and the password you chose:
Everything should work just fine and you should be able to browse the database now, just as you did using Windows Integrated Authentication.
You can freely browse the database in the Server Explorer:
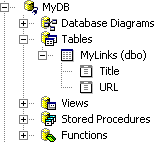
Server Explorer also shows us the table and the columns. What’s great about this is that you can actually drag and drop the columns and even the table on the design area of the Web Application. And this is what we’re going to do, as I said earlier, we’re going to do this the Visual Studio way – quick and simple.
So grab the MyLinks (dbo) item and drop it on the design area. You are warned that the password is saved as clear text – ignore and choose Include password. Now a Data Adapter Configuration Error pops up that tells us it couldn’t generate the UPDATE and DELETE statements. We don’t mind, we only want to retrieve data from the database right now.
sqlConnection1 and sqlDataAdapter1 are created. Now we only have to code the part where we retrieve rows from the database. And thanks to Visual Studio .NET, it won’t take long.
Open the code behind file (WebForm1.aspx.cs) and inside Page_Load use the following code:
// Open the connection

sqlConnection1.Open();

// Create a new DataReader and assign it to select command

System.Data.SqlClient.SqlDataReader sqlDataReader1 = sqlSelectCommand1.ExecuteReader();

// Loop through the DataReader

while(sqlDataReader1.Read())

{

   // Display the value inside the Title column

   Response.Write(sqlDataReader1["Title"] + " - ");

   // And the value inside the URL column

   Response.Write(sqlDataReader1["URL"] + "<br />");

}
Compile and see the result in Internet Explorer:

We successfully connected to a SQL database from an ASP .NET application using SQL Authentication!
Get yourself a beer or whatever you may drink and enjoy your accomplishment.


