This C# tutorial will teach you how to create delegates and events in C# using a practical example of creating two applications, a client and a multi-threaded server. You will learn how to fire your own custom event from a class and handle it in a different class.
Event firing and handling
The scope of this tutorial is to teach you how to create your own events, fire them and handle them. If you done any C# programming you’re sure to have used events already. The click of a button, the loading of the form, all these are events that are coded into the .NET Framework. However when you create your own classes, many times you’ll find it necessary to create your own events. For taking full advantage of this tutorial it’s best that you know at least the basics of object oriented programming in C#, such as classes, constructors, properties, instantiation, etc. Also if you know anything about working with threads, it will help.
In this tutorial we’re going to create a real-life application, or at least the start of a real-life application. It will consist of two projects: a client and a server. The client application connects to the server application through TCP IP. These two applications could connect to each other through a network or through the Internet. As long as the port specified is the same in both applications (and the firewall doesn’t block it), and if you specified the correct IP addresses, everything will work just fine. But where do the delegates and events come into play? In the server application. There we will have a class that listens for connections. When a client is accepted, we want an event to be fired. This event should be handled in the class that displays the form, so that we can show a message box.
Let’s start by creating the client application, which has very little code to it.
The client application Start Visual Studio 2005 and create a new C# Windows Application. I called mine “LilClient”:
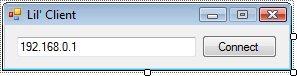
This is what our client application looks like. A TextBox and a Button btnConnect. The TextBox is named txtIp and it will store the IP address of the server that we want to connect to. Obviously this depends on where you’ll run your server application. You could run it on the very same computer as the client application. However most important is that the IP address is the one of your machine, if you’re going to run the client and the server on the same machine, or in a network, you should use the computer’s network IP. Many times this is 192.168.0.1 however in my network it is 192.168.1.101. You can find the list of IP addresses that your computer uses by doing an ipconfig command at the MS-DOS command prompt.
First thing to do in this Windows Application is to add this using statement:
using System.Net.Sockets;Double click the btnConnect button and you’ll get to its Click event (speaking of events, eh!); inside add the following code:
private void btnConnect_Click(object sender, EventArgs e)

{

    // Create a new TCP client

    TcpClient tcpServer = new TcpClient();

    // Connect it to the specified IP address and port

    tcpServer.Connect(txtIp.Text, 1986);

    // Close the connection

    tcpServer.Close();

}
“A connection attempt failed because the connected party did not properly respond after a period of time, or established connection failed because connected host has failed to respond”exception if the IP address you have entered is incorrect.
Next comes the server application where we’re going to get into the real scope of this tutorial: delegates and custom events.
The server application Start a new C# project. I gave mine a more serious name this time: “CustomEventsAndDelegates” – sounds classy, doesn’t it?
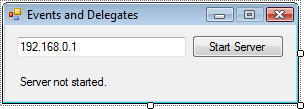
The form is very similar to the one of the client: we have our txtIp TextBox, a btnStart Button and a lblStatus Label. Switch to code view and since we’ll be using the IPAddress object in this class, add the following:
using System.Net;Now double click the Start Server button to get to its Click event where you’ll use the following code:
private void btnStart_Click(object sender, EventArgs e)

{

    // Parse the IP address from the textbox into an IPAddress object

    IPAddress ipAddr = IPAddress.Parse(txtIp.Text);

    // Create a new instance of the Monitor class and pass the IP address to the constructor

    Monitor myMonitor = new Monitor(ipAddr);

    // Bind the event to an event handler

    myMonitor.StatusChangedEvent += new StatusChangedHandler(myMonitor_StatusChanged);

    // Call the method that starts monitoring for connections

    myMonitor.StartMonitoring();

    // Let the user know

    lblStatus.Text = "Monitoring for connections...";

}
So what’s happening here? First we simply create an IPAddress object where we store the IP address in the Text Box. Now I should tell you that the IP address in the TextBox is the IP address of the server, and since a server can have multiple network devices and IP addresses, we don’t know which one should be used. Thus, the IP address should be typed in, or alternatively you can have the server application retrieve the list of IP addresses as shown in this tutorial I wrote a couple of years ago: http://www.geekpedia.com/tutorial149_Get-the-IP-address-in-a-Windows-application.html. The IP address should be the same one as the one that’s entered in the client application.
What’s the deal with the Monitor object? What namespace is that? Well that’s the class we’re going to create next. The main purpose of this class is to monitor for incoming connections from client applications. It will have a constructor that takes an IPAddress object, and that’s why we pass the IP address to it when initializing the myMonitor object.
The next line is most interesting. That’s where we bind the event that we’re going to create very soon to an event handler. You can see that the event handler’s name is myMonitor_StatusChanged, remember this because we’re having a look at it in a second.
The last two lines are self explanatory: a method to start monitoring is called on the myMonitor object, and a label on the form is updated.
There’s only one piece of code left in this class and that is the event handler:
public void myMonitor_StatusChanged(object sender, StatusChangedEventArgs e)

{

    MessageBox.Show("We got a call from the Monitor class:\r\n" + e.EventMessage, "Message From Server", MessageBoxButtons.OK, MessageBoxIcon.Information);

}
If you’re not familiar with event handlers at all, you should know that this piece of code executes when we fire the event from a different class. If you looked at the Click events of various form objects such as buttons, this must be familiar to you. Only this time the handler is for our own custom event. And another interesting thing to note is that when this event fires, a parameter is passed to it through StatusChangedEventArgs e. This parameter will hold a message sent by the monitoring class, such as “A client has successfully connected!”
Creating and firing your own event Now we’re going to create our final code for this tutorial, but the most important. This is the code that monitors for connections, and when a client does connect, it will fire an event, event which we already handled in the main Form1 class.
In Visual Studio 2005 add a new class file: Monitor.cs. Add the following using statements since we’ll be using networks & threads:
using System.Net;

using System.Net.Sockets;

using System.Threading;
This file will actually contain two classes. One is the Monitor class which we kept talking about but we never seem to get to 🙂 and the other is the StatusChangedEventArgs class that inherits EventArgs.
Since an event is really a delegate, we need to define a delegate with the signature that we want for the event. Might want to read that twice. For instance we want to pass some arguments – StatusChangedEventArgs, and the only place to define them is in the delegate’s signature. So inside Monitor.cs and the namespace, but not inside the class, put the following line:
public delegate void StatusChangedHandler(object sender, StatusChangedEventArgs e);Now that we know how the event will look like, thanks to the delegate signature, we need to define what arguments StatusChangedEventArgs will contain. First we need some way to set these arguments, because they’re being passed useless if we don’t set them to a value. And that’s why we need a constructor. Of course, we also want to retrieve the arguments out of StatusChangedEventArgs so we need a property. All these will be defined into a class named StatusChangedEventArgs. you should put it in the Monitor.cs file:
public class StatusChangedEventArgs : EventArgs


{

    // This will store our only parameter / event argument, which is the event message

  private string EventMsg;


    // We need to define this property in order to retrieve the message in the event handler, back in Form1.cs

  public string EventMessage

  {

    get

    {

       return EventMsg;

    }

    }

    // The constructor will set the message

    public StatusChangedEventArgs(string strEventMsg)

    {

        EventMsg = strEventMsg;

    }

}
So we have the arguments defined, we can set and retrieve them. Inside Monitor.cs we should now deal with the Monitor class for which we created the file in the first place. And finally here it is, in all its glory, our Monitor class:
class Monitor


{

    // Will store the IP address passed to it

    IPAddress ipAddress;


    // The constructor sets the IP address to the one retrieved by the instantiating object

   public Monitor(IPAddress address)

    {

        ipAddress = address;

} // Declare the event that we'll fire later
public event StatusChangedHandler StatusChangedEvent;
// The thread that will hold the connection listener
private Thread thrListener;
// The TCP object that listens for connections
private TcpListener tlsServer;
// The thread that will send information to the client
private Thread thrSender;
// Will tell the while loop to keep monitoring for connections
bool ServRunning = false; public void StartMonitoring()
{
// Get the IP of the first network device, however this can prove unreliable on certain configurations
IPAddress ipaLocal = ipAddress;
if (tlsServer == null)
{
// Create the TCP listener object using the IP of the server and the specified port
tlsServer = new TcpListener(ipaLocal, 1986);
}
// Start the TCP listener and listen for connections
tlsServer.Start();
// The while loop will check for true in this before checking for connections
ServRunning = true;
// Start the new tread that hosts the listener
thrListener = new Thread(KeepListening);
thrListener.Start();
} private void KeepListening()
{
TcpClient tclServer;
// While the server is running
while (ServRunning == true)
{
// Accept a pending connection
tclServer = tlsServer.AcceptTcpClient();
// Start a new thread where our new client who just connected will be managed
thrSender = new Thread(new ParameterizedThreadStart(AcceptClient));
// The thread calls the AcceptClient() method
thrSender.Start(tclServer);
}
} // Occures when a new client is accepted
private void AcceptClient(object newClient)
{
// Set the argument/parameter to a message explaining what just happened
StatusChangedEventArgs evArg = new StatusChangedEventArgs("A client was successfully accepted.");
// Fire the event because a new client was accepted
StatusChangedEvent(this, evArg);
}
}
With the comments it’s pretty much self explanatory. There’s a method that starts the monitoring, one that does the listening, and finally one that accepts a client. Technically it doesn’t do anything with the client connection, it just lets the main form know that a client has connected successfully, which was the main purpose of this tutorial all along.
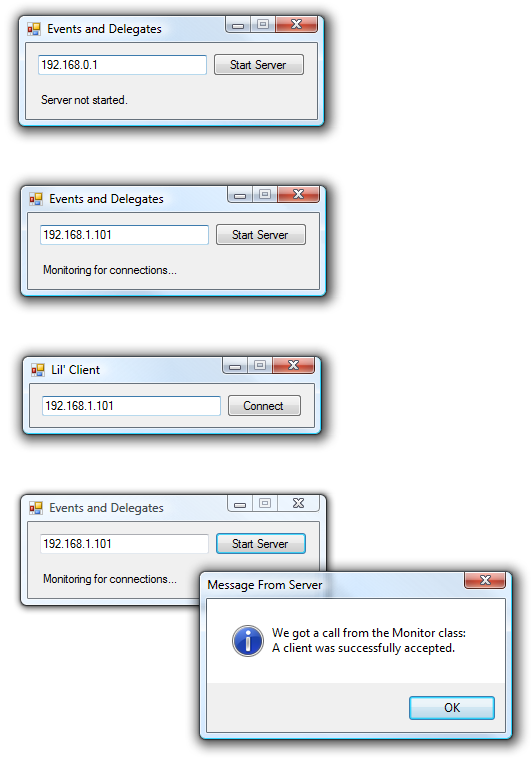
Now that wasn’t that hard, was it? If you run both applications and most importantly, input the correct IP addresses, you should get a message on the server application once you connect the client to it. And behind that, which looks like a very simple task to accomplish, you’ll know that a lot of stuff really happens, an event defined by the signature of a delegate fires from a class, and with it carries the parameters defined in another class. The event is handled in the class that holds the form, which shows the message box. Here’s the entire process:
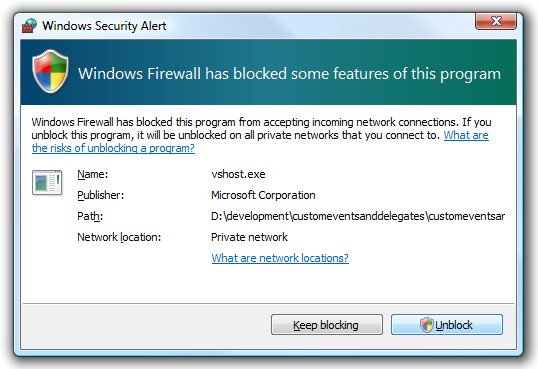
P.S.: If when you run your client application you get an alert from the Windows Firewall or any other firewall for that matter, don’t forget to unblock the application: