The C# application in this tutorial will retrieve disk drive information such as the model, serial number, capacity, interface, cylinders, heads, sectors and tracks from WMI.
About WMI In order to get a list of all the disk drives available on the current machine, the .NET Framework won’t be enough, and so we’ll have to run a WMI query. Since WMI uses WQL (WMI Query Language), it’s very easy to retrieve the information which we need, much like running queries on a SQL database. Since SQL is also a query language it makes sense that the queries would look similar, doesn’t it?
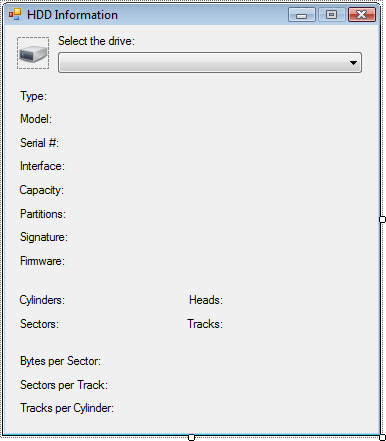
Designing the application Visual Studio 2005 is what I built my project in, although the code will work in Visual Studio 2003 and Visual Studio 2008 as well. On a form we’ll need a ComboBox called cmbHdd that will store a list of available disk-drive, and a whole lot of labels. They will display all of the fields that WMI gives to us, or almost all. I’m not going to enumerate all the labels here since it’s easy enough for you to figure them out from the code. Here’s what my form looks like:
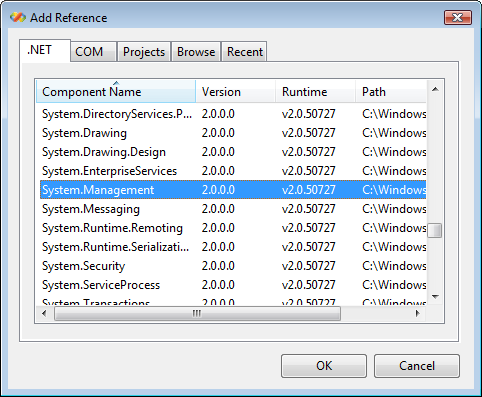
Querying WMI for disk drive information While you still have your hand on the mouse, we’ll need a reference to System.Management before we can query WMI. That can easily be done by right clicking “Reference” in the Solution Explorer and selecting “Add Reference.”

In the .NET tab scroll down to System.Management and click OK to add this reference.
Switch to code view and add the following using statement:
using System.Management;


In the form's Load event we want to retrieve all the disk drives, so we run our first WMI query:


private void Form1_Load(object sender, EventArgs e)

{

    // Get all the disk drives

    ManagementObjectSearcher mosDisks = new ManagementObjectSearcher("SELECT * FROM Win32_DiskDrive");

    // Loop through each object (disk) retrieved by WMI

    foreach (ManagementObject moDisk in mosDisks.Get())

    {

        // Add the HDD to the list (use the Model field as the item's caption)

        cmbHdd.Items.Add(moDisk["Model"].ToString());

    }

}
Nothing complicated here, except a loop going through the list of WMI values. When a selection from the drop-down list is made, we will want to get additional information on the chosen disk drive:
private void cmbHdd_SelectedIndexChanged(object sender, EventArgs e)
{
// Get all the disk drives from WMI that match the Model name selected in the ComboBox
ManagementObjectSearcher mosDisks = new ManagementObjectSearcher("SELECT * FROM Win32_DiskDrive WHERE Model = '" + cmbHdd.SelectedItem + "'");
// Loop through the drives retrieved, although it should normally be only one loop going on here
foreach (ManagementObject moDisk in mosDisks.Get())
{
// Set all the fields to the appropriate values
lblType.Text = "Type: " + moDisk["MediaType"].ToString();
lblModel.Text = "Model: " + moDisk["Model"].ToString();
lblSerial.Text = "Serial: " + moDisk["SerialNumber"].ToString();
lblInterface.Text = "Interface: " + moDisk["InterfaceType"].ToString();
// The capacity in gigabytes is easily calculated
lblCapacity.Text = "Capacity: " + moDisk["Size"].ToString() + " bytes (" + Math.Round(((((double)Convert.ToDouble(moDisk["Size"]) / 1024) / 1024) / 1024), 2) + " GB)";
lblPartitions.Text = "Partitions: " + moDisk["Partitions"].ToString();
lblSignature.Text = "Signature: " + moDisk["Signature"].ToString();
lblFirmware.Text = "Firmware: " + moDisk["FirmwareRevision"].ToString();
lblCylinders.Text = "Cylinders: " + moDisk["TotalCylinders"].ToString();
lblSectors.Text = "Sectors: " + moDisk["TotalSectors"].ToString();
lblHeads.Text = "Heads: " + moDisk["TotalHeads"].ToString();
lblTracks.Text = "Tracks: " + moDisk["TotalTracks"].ToString();
lblBytesPerSect.Text = "Bytes per Sector: " + moDisk["BytesPerSector"].ToString();
lblSectorsPerTrack.Text = "Sectors per Track: " + moDisk["SectorsPerTrack"].ToString();
lblTracksPerCyl.Text = "Tracks per Cylinder: " + moDisk["TracksPerCylinder"].ToString();
}
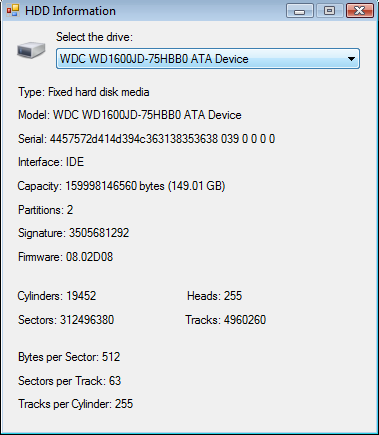
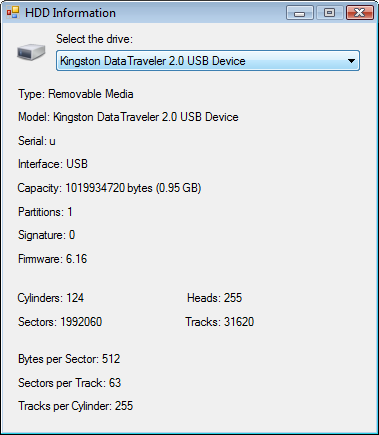
}You’re now ready to compile. Here’s how the applications looks on the machine I tested, one that has a single hard-drive and a memory stick plugged in. You can see that the memory stick, just like any other storage media you have plugged in, will show as a disk drive, so don’t let the term “disk” confuse you in what will be retrieved here. All the storage drives that are not optical removable media are sure to be retrieved by the WMI query in this application, for as long as they show up in the Computer window at least.
It doesn’t get any easier than this, and using WMI you can get a lot of other information just as easy. Here are a few other tutorials we have here at Geekpedia that will teach you more about WMI:


