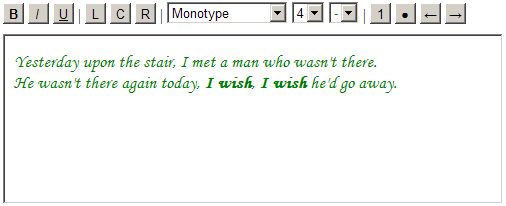
This tutorial will explain how to create a rich text editor in a webpage using simply an iFrame in editable mode and its methods.

First of all we have to create the HTML elements that we will use to change the content and appearance of what’s inside the rich text editor:
<body onLoad="def()">
<div style="width:500px; text-align:left; margin-bottom:10px ">
<input type="button" id="bold" style="height:21px; width:21px; font-weight:bold;" value="B" />
<input type="button" id="italic" style="height:21px; width:21px; font-style:italic;" value="I" />
<input type="button" id="underline" style="height:21px; width:21px; text-decoration:underline;" value="U" /> |
<input type="button" style="height:21px; width:21px;"value="L" title="align left" />
<input type="button" style="height:21px; width:21px;"value="C" title="center" />
<input type="button" style="height:21px; width:21px;"value="R" title="align right" /> |
<select id="fonts">
<option value="Arial">Arial</option>
<option value="Comic Sans MS">Comic Sans MS</option>
<option value="Courier New">Courier New</option>
<option value="Monotype Corsiva">Monotype</option>
<option value="Tahoma">Tahoma</option>
<option value="Times">Times</option>
</select>
<select id="size">
<option value="1">1</option>
<option value="2">2</option>
<option value="3">3</option>
<option value="4">4</option>
<option value="5">5</option>
</select>
<select id="color">
<option value="black">-</option>
<option style="color:red;" value="red">-</option>
<option style="color:blue;" value="blue">-</option>
<option style="color:green;" value="green">-</option>
<option style="color:pink;" value="pink">-</option>
</select> |
<input type="button" style="height:21px; width:21px;"value="1" title="Numbered List" />
<input type="button" style="height:21px; width:21px;"value="●" title="Bullets List" />
<input type="button" style="height:21px; width:21px;"value="←" title="Outdent" />
<input type="button" style="height:21px; width:21px;"value="→" title="Indent" />
</div>
Next we need to create an iFrame, this is where the text will be written and edited.
<iframe id="textEditor" style="width:500px; height:170px;">
</iframe>
We can now write the Javascript code.
First of all, in order to use the iFrame we have to set it to design mode. Then we have to open, write and close that iFrame.
<script type="text/javascript">
<!--
textEditor.document.designMode="on";
textEditor.document.open();
textEditor.document.write('<head><style type="text/css">body{ font-family:arial; font-size:13px;}</style></head>');
textEditor.document.close();
You can see that the write() method has some CSS for a parameter – that is because I wanted to set the iFrame’s default font and font size.
It’s time to write the function that will be called by the HTML elements created earlier. This is a very simple function, we only need 2 iFrame methods: execCommand() and focus(). execCommand() will execute a command on the current document, current selection, or the given range, and focus() will give the focus back to the iFrame.
function fontEdit(x,y)
{
textEditor.document.execCommand(x,"",y);
textEditor.focus();
}
We will use this function with all the HTML elements. Let’s start with the Bold button.
We just have to set the event which will call the function, and give a parameter to the function. Because it’s a button, we will use the onClick event.
<input type="button" id="bold" style="height:21px; width:21px; font-weight:bold;" value="B" onClick="fontEdit('bold')" />When called, the function will make the text bold. We do the same thing for the rest of the buttons, changing the parameter.
<input type="button" id="italic" style="height:21px; width:21px; font-style:italic;" value="I" onClick="fontEdit('italic')" />
<input type="button" id="underline" style="height:21px; width:21px; text-decoration:underline;" value="U" onClick="fontEdit('underline')" /> |
<input type="button" style="height:21px; width:21px;"value="L" onClick="fontEdit('justifyleft')" title="align left" />
<input type="button" style="height:21px; width:21px;"value="C" onClick="fontEdit('justifycenter')" title="center" />
<input type="button" style="height:21px; width:21px;"value="R" onClick="fontEdit('justifyright')" title="align right" /> |
Now it’s time to take care of the dropdown Font, Size and Color lists. Because these lists have multiple values, we have pass the selected index value as the second parameter. Also, the event that will call the function will be onChange.
<select id="fonts" onChange="fontEdit('fontname',this[this.selectedIndex].value)">
   <option value="Arial">Arial</option>
   <option value="Comic Sans MS">Comic Sans MS</option>
   <option value="Courier New">Courier New</option>
   <option value="Monotype Corsiva">Monotype</option>
   <option value="Tahoma">Tahoma</option>
   <option value="Times">Times</option>
</select>
<select id="size" onChange="fontEdit('fontsize',this[this.selectedIndex].value)">
   <option value="1">1</option>
   <option value="2">2</option>
   <option value="3">3</option>
   <option value="4">4</option>
   <option value="5">5</option>
</select>
<select id="color" onChange="fontEdit('ForeColor',this[this.selectedIndex].value)">
   <option value="black">-</option>
   <option style="color:red;" value="red">-</option>
   <option style="color:blue;" value="blue">-</option>
   <option style="color:green;" value="green">-</option>
   <option style="color:pink;" value="pink">-</option>
</select> |
For example fontEdit(‘fontname’,’times’) will change the font to Times. It’s easy to figure out how the other dropdown lists will work.
Finally, I made a function to set the dropdown lists’ default state; this will help the Font dropdown list avoid writing “Times” after refresh (when the default font is Arial), for example. The function will be called on load, by <body onLoad=”def()”>.
Here is the entire code for a JavaScript text editor:
<html>
<head>
</head>
<body onLoad="def()"><center>
<div style="width:500px; text-align:left; margin-bottom:10px ">
<input type="button" id="bold" style="height:21px; width:21px; font-weight:bold;" value="B" onClick="fontEdit('bold')" />
<input type="button" id="italic" style="height:21px; width:21px; font-style:italic;" value="I" onClick="fontEdit('italic')" />
<input type="button" id="underline" style="height:21px; width:21px; text-decoration:underline;" value="U" onClick="fontEdit('underline')" /> |
<input type="button" style="height:21px; width:21px;"value="L" onClick="fontEdit('justifyleft')" title="align left" />
<input type="button" style="height:21px; width:21px;"value="C" onClick="fontEdit('justifycenter')" title="center" />
<input type="button" style="height:21px; width:21px;"value="R" onClick="fontEdit('justifyright')" title="align right" /> |
<select id="fonts" onChange="fontEdit('fontname',this[this.selectedIndex].value)">
   <option value="Arial">Arial</option>
   <option value="Comic Sans MS">Comic Sans MS</option>
   <option value="Courier New">Courier New</option>
   <option value="Monotype Corsiva">Monotype</option>
   <option value="Tahoma">Tahoma</option>
   <option value="Times">Times</option>
</select>
<select id="size" onChange="fontEdit('fontsize',this[this.selectedIndex].value)">
   <option value="1">1</option>
   <option value="2">2</option>
   <option value="3">3</option>
   <option value="4">4</option>
   <option value="5">5</option>
</select>
<select id="color" onChange="fontEdit('ForeColor',this[this.selectedIndex].value)">
   <option value="black">-</option>
   <option style="color:red;" value="red">-</option>
   <option style="color:blue;" value="blue">-</option>
   <option style="color:green;" value="green">-</option>
   <option style="color:pink;" value="pink">-</option>
</select> |
<input type="button" style="height:21px; width:21px;"value="1" onClick="fontEdit('insertorderedlist')" title="Numbered List" />
<input type="button" style="height:21px; width:21px;"value="●" onClick="fontEdit('insertunorderedlist')" title="Bullets List" />
<input type="button" style="height:21px; width:21px;"value="←" onClick="fontEdit('outdent')" title="Outdent" />
<input type="button" style="height:21px; width:21px;"value="→" onClick="fontEdit('indent')" title="Indent" />
</div>
<iframe id="textEditor" style="width:500px; height:170px;">
</iframe>
</center>
<script type="text/javascript">
<!--
textEditor.document.designMode="on";
textEditor.document.open();
textEditor.document.write('<head><style type="text/css">body{ font-family:arial; font-size:13px; }</style> </head>');
textEditor.document.close();
function def()
{
   document.getElementById("fonts").selectedIndex=0;
   document.getElementById("size").selectedIndex=1;
   document.getElementById("color").selectedIndex=0;
}
function fontEdit(x,y)
{
   textEditor.document.execCommand(x,"",y);
   textEditor.focus();
}
-->
</script>
</body>
</html>


