
This is part I of the tutorial that teaches you how to connect to a SQL database from ASP .NET using SQL Authentication. This part shows you how to set up MSDE for Mixed Mode and how to use Web Data Administrator to create databases and users.
This tutorial (divided in two parts) will show you how to connect from an ASP .NET web application to a SQL database using SQL authentication. To accomplish this you need to follow a series of steps, first to change some of the settings of SQL Server 2000 and create a database and a user and then to actually connect to the database using ASP .NET with Visual Studio .NET.
I suppose you’re going to use the MSDE 2000 (Microsoft SQL Server 2000 Desktop Engine) – the free version of the database.
First set up the database using the tutorial named ‘Setting up MS SQL Server 2000‘.
Authentication Mode
There are two possible authentication modes for MSDE: Windows Integrated and SQL Login. By default, MSDE is using Windows Integrated authentication.
But if you create some website that you are preparing to upload to a webhost, you’ll probably want to prepare it for SQL Login.
Because MSDE 2000 (being free) doesn’t have a user interface we need to change the authentication mode from the registry.
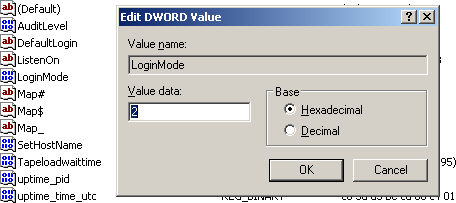
Navigate using regedit to HKEY_LOCAL_MACHINE\SOFTWARE\Microsoft\MSSQLServer\MSSQLServer and double-click the LoginMode key. The value that LoginMode currently holds is probably 1 which means Windows Integrated. We change this to the value 2, which means Mixed Mode:
Creating a new database
Open Microsoft SQL Web Data Administrator (if you don’t have it installed read this) – if you don’t start it from the Start Menu you can usually find it at http://localhost/webadmin.
First login using the Windows Integrated option, and also leave the other fields with the default values – just press the Login button.
After you are logged in, the Databases page shows up. It displays the available databases:
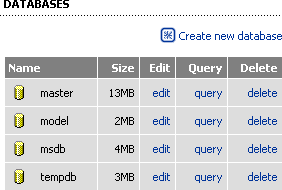
Click on the Create new database link. You are asked to enter a name for the new database – enter ‘MyDB’ (without the quotes) and click Create.
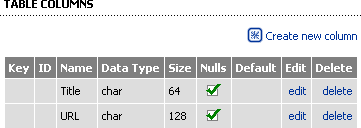
After the database is created you can see that no there are no tables to be displayed. So let’s create one by using the Create new table link. When you are prompted to enter a new name for the table choose ‘MyLinks’ and click Create. The table is created and we are redirected to the Edit Column page where we can add a new column to the table, and we will.
In the Column Name field enter ‘Title’. Leave the Data Type to char, but change the Length property to ’64’ (characters). Leave the rest unchanged and press Add.
The new column was created but let’s create another one.
Again click on the Create new column link and set the Column Name to ‘URL’ and the length field to ‘128’. Press submit and the second column is created:
From the left side menu choose Query cause we’re going to store a value.
Run the following query there:
INSERT INTO MyLinks (Title, URL) VALUES ('Geekpedia', 'http://www.geekpedia.com')Now that you are still at the Query page, run the following query to see the inserted rows:
SELECT * FROM MyLinksLook at the bottom of the page and you’ll see the row we just inserted:

Creating a new user
Now you’re going to create a new user with a password, that we’ll use to connect to the database from the web application. Again, we’ll accomplish using Microsoft SQL Web Data Administrator.
From the left menu choose the Security link This will bring you to the Security page where you’ll encounter two icons. Choose Logins. The Logins page shows the current accounts that are allowed to use access the database along with their privileges.
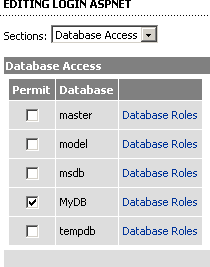
Above the table, there is a Create new login link. Click it and from the page that shows up choose Sql Login. For the login name I recommend using aspnet and for the password… well, it’s your choice. After you complete the fields and click the Create Login link, the Editing login aspnet page shows up. Go to Database Access section and check the checkbox next to MyDB:
Save changes and you can now see the result – the login has been added:

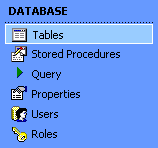
There’s one more thing. We need to set the privileges for this user. So on the left menu choose Databases, from the list of the databases that showed up click MyDB, of course. The left menu now has some other new items:
Choose Users and now a page shows up with a table that contains the users that have access to this database. Obviously, we are interested in aspnet, so click the Edit link next to it. The roles for this user show up with a checkbox next to them. As we currently don’t want to waste time, check them all, except db_denydatareader and db_denydatawriter. Save the settings with the Save User button.
We’re done.
Now you can test it. Logout (there’s a small X button in the upper-right corner of the page that will log you out) and at the login page choose SQL Login instead of Windows Integrated and enter the username (aspnet) and the password you choosed earlier.
That’s it, the database is set up, now we only have to connect to it from the ASP .NET web application. This is covered in part II of the tutorial:


