Covers the creation of child forms at runtime inside a MDI form and other programming aspects, like building menus.
Applications like Microsoft Word or even Microsoft Visual Studio use MDI (Multiple Document Interface) forms. Named so because of their main characteristic – holding multiple other forms (documents) like a container.
It’s not neccesary to discuss more about this as you already know MDI from you day-to-day use.
Create a new ‘Windows Application’ project in Microsoft Visual C# .NET named ‘MDI’ (or whatever you want).
In the properties of the newly created form set the ‘IsMdiContainer’ property to true. This will make the form a MDI form just as we want it.
How can we create child forms at runtime?
Create a new menu ‘mainMenu1’ by double-clicking ‘MainMenu’ from the Toolbox.
Create two menu items named ‘File’ and ‘Windows’. Name them ‘mnuFile’ and ‘mnuWindows’.
Set the ‘MdiList’ property of the ‘mnuWindows’ menu to ‘True’. This way in this menu the currently opened child forms will be displayed.
Create two items in the File menu: ‘New’ and ‘Exit’. Name them ‘mnuFileNew’ and ‘mnuFileExit’.
For the item ‘New’ create the sub-items ‘Standard’, ‘Blue’ and ‘Red’. Name them ‘mnuFileNewStandard’, ‘mnuFileNewBlue’ and ‘mnuFileNewRed’.
The hierarchy for the File menu should look like this.
File->New-->Original-->Blue-->Red->ExitIt’s better to understand with a screenshot:
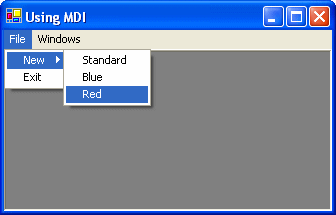
As you know from Microsoft Word and all the other MDI applications, the creation of new child forms is made from a menu or a toolbar. In this tutorial we use a menu.
We choosed in this tutorial to be able to build 3 types of child forms, ‘Original’, ‘Blue’ and ‘Red’.
Let’s see how we can create a child form at runtime, as this is the main scope of the tutorial.
Double click the ‘Original’ item from the File -> New menu.
Visual C# .NET sends us to the part where we code:
private void mnuFileNewStandard_Click(object sender, System.EventArgs e)
{

}
Replace the code with the following:
private void mnuFileNewStandard_Click(object sender, System.EventArgs e)
{
    // Create a new form
    Form standardFrm = new Form();

    // Give it a title
    standardFrm.Text = "Standard Form";

    // Who's child is this window
    standardFrm.MdiParent = this;

    // Show it
    standardFrm.Show();
}
In the first line we create a new form named ‘standardFrm’. The new form is created like any other form. In the second we give it a generic title.
In the third we specify the parent of the newly created window by setting MdiParent to the current main window (this). This makes the form appear in the MDI form.
Finally the form is displayed.
It’s time to make the blueFrm. Double click the ‘Blue’ item from the File -> New menu.
After Visual C# .NET takes you to the part where you code, use the following code:
private void mnuFileNewBlue_Click(object sender, System.EventArgs e)
{
    // Create a new form
    Form blueFrm = new Form();

    // Give it a title
    blueFrm.Text = "Blue Form";

    // Change the background color of the form
    blueFrm.BackColor = System.Drawing.Color.Blue;

    // Make the child form maximized
    blueFrm.WindowState= System.Windows.Forms.FormWindowState.Maximized;

    // Who's child is this window
    blueFrm.MdiParent = this;

    // Show it
    blueFrm.Show();
}
Again we create a new form, this time named ‘blueFrm’ and we give it a title.
We set the background color of the new form to blue in the third line of code.
Next we set the WindowsState of the Window to Maximized.
We assign the window to the parent window (MDI) and display it.
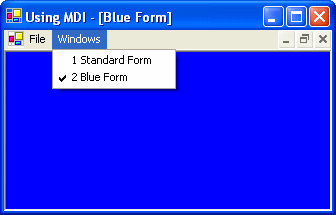
After you compile the code create a new Standard form and a Blue form.
As you saw, the Blue form is maximized. Click the ‘Windows’ menu and you will see the list of available opened forms and a checkmark next to the one selected. Using this menu you can easily switch between forms.
Finally, let’s make the code for redFrm by double clicking the ‘Red’ item from the File -> New menu and inserting this code:
private void mnuFileNewRed_Click(object sender, System.EventArgs e)
{
    // Create a new form
    Form redFrm = new Form();

    // Give it a title
    redFrm.Text = "Red Form";

    // Change the background color of the form
    redFrm.BackColor = System.Drawing.Color.Red;

    // Create a new button
    Button newStandardBtn = new Button();

    // Set the width of the button
    newStandardBtn.Width = 120;

    // Set the caption of the button
    newStandardBtn.Text = "New Standard form";

    // Set the position of the button
    newStandardBtn.Left = (redFrm.Width - newStandardBtn.Width) / 2;
    newStandardBtn.Top = 20;

        // When the button is clicked create a Standard form
    newStandardBtn.Click += new System.EventHandler(this.mnuFileNewStandard_Click);

    // Add the button to the form
    redFrm.Controls.Add(newStandardBtn);

    // Who's child is this window
    redFrm.MdiParent = this;

    // Show it
    redFrm.Show();
}
As you can see, the first lines do the same thing as the earlier examples.
On the next lines we create a button named ‘newStandardBtn’ and give it a width of 120 pixels. Next we set this button’s Text property to ‘New Standard form’ – because it will create a new Standard form.
We horizontally center the button by finding the center of the form (substract the width of the button from the form and divide the result by 2) and set the vertical position 20 pixels far from the top.
When the Click event of the button occurs, that is when the user clicks the button we want to act the same as if he was clicking the Standard item from the File -> New menu.
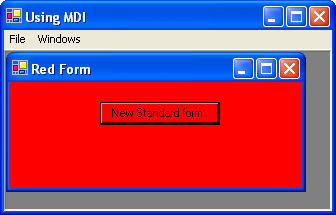
After that the button is added to the form and we’re finished!
The following is a screenshot of our brand new ugly red form:
If you want to add functionality to the ‘Exit’ item in the ‘File’ menu add the following code after double clicking on it:
private void mnuFileExit_Click(object sender, System.EventArgs e)
{
    Application.Exit();
}

