In this two part tutorial you will learn how to create a chat client that connects to a chat server and exchanges messages with all the other connected clients. The first part covers the development of the client application.
» C# Chat: Part 1 – Building the Chat Client (currently reading)
» C# Chat: Part 2 – Building the Chat Server
Building a Chat Server and a Chat Client
To no avail I’ve been searching the web for a good C# chat client/server application that is not thousands of lines of code long. The only simple ones I could find were flawed or very buggy, but then again I tried to combine the good parts of all the tutorials I found into one application, and one tutorial that you can see here today. We are going to build a fairly larger application (a few hundred lines of codes) than the ones we’re used to here on Geekpedia, but we’re still going to keep it simple. In fact, there will be two applications: one is a chat server, that handles incoming connections, stores them in hash tables, and distributes new messages to everyone connected, and the other is of course, the chat client, which connects to the server, sends messages and listens for incoming messages. A little knowledge of C#’s networking objects, multi-threading, events and delegates will definitely help you understand this tutorial more easily. A good way to start learning about delegates, events and creating client-server applications is to read the Delegates and Events in C# tutorial first.
The chat server will be able to accept as many chat clients as allowed by the hash table (and you are able to define the limit of the hash table yourself), and it will also track all the messages that are going back and forth in its own chat window, so you should be able to scale this code to a full blown chat application as long as you add the necessary error handling and the bells and whistles.
The client application The client application is, as you might have expected, the simpler one, since all it has to do is to attempt to connect to the chat server, request an username, start listening for messages and sending its own, and finally disconnecting.
Start Visual Studio 2005 and create a new C# Windows Application. I’ve given mine the obvious “Chat Client” name.
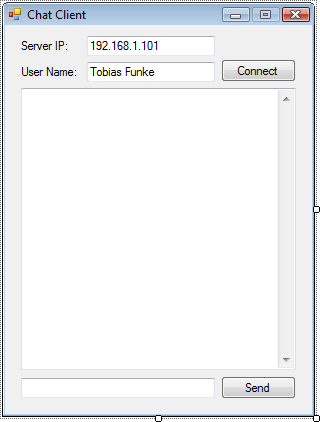
The first two TextBoxes (txtIp and txtUser) will hold the IP address of the server we want to connect to and the desired username. Before testing out this code keep in mind to change this IP address to the one of the computer in your network that runs the client. If you read the Delegates and Events in C# tutorial, you probably assume you can run the chat application and the server application on the same machine, without needing two different computers connected through a network or the Internet. And you would be right.
The Connect (btnConnect) and Send (btnSend) buttons are obvious, they’re for connecting to the server and sending messages. The large multi-line TextBox is named txtLog and it is where all the messages will be shown.The small TextBox at the bottom is called txtMessage and it is where the message to be sent to the server will be typed.
Now that we’re done with the actual design of the form, we can finally code. Since we will be making use of networking, streaming and threading objects, start by adding the following using statements:
using System.Net;

using System.Net.Sockets;

using System.IO;

using System.Threading;
We’re going to declare most of our objects inside the class, as private, since we don’t need them accessible from anywhere else outside the class:
// Will hold the user name

private string UserName = "Unknown";

private StreamWriter swSender;

private StreamReader srReceiver;

private TcpClient tcpServer;

// Needed to update the form with messages from another thread

private delegate void UpdateLogCallback(string strMessage);

// Needed to set the form to a "disconnected" state from another thread

private delegate void CloseConnectionCallback(string strReason);

private Thread thrMessaging;

private IPAddress ipAddr;

private bool Connected;
And now that we have them declared, let’s put them to use. Let’s start with the btnConnect_Click event which can be automatically generated if you double click on the Connect button. Inside it we’re going to check whether or not we are connected to a server. If we are, we should call the method that initializes the connection, otherwise we call the method that closes the connection, also specifying a reason why to it:
private void btnConnect_Click(object sender, EventArgs e)

{

    // If we are not currently connected but awaiting to connect

    if (Connected == false)

    {

        // Initialize the connection

        InitializeConnection();

    }

    else // We are connected, thus disconnect

    {

        CloseConnection("Disconnected at user's request.");

    }

}
All simple so far, so let’s move to InitializeConnection():
private void InitializeConnection()

{

    // Parse the IP address from the TextBox into an IPAddress object

    ipAddr = IPAddress.Parse(txtIp.Text);

    // Start a new TCP connections to the chat server

    tcpServer = new TcpClient();

    tcpServer.Connect(ipAddr, 1986);
// Helps us track whether we're connected or not
Connected = true;
// Prepare the form
UserName = txtUser.Text; // Disable and enable the appropriate fields
txtIp.Enabled = false;
txtUser.Enabled = false;
txtMessage.Enabled = true;
btnSend.Enabled = true;
btnConnect.Text = "Disconnect";
// Send the desired username to the server

    swSender = new StreamWriter(tcpServer.GetStream());

    swSender.WriteLine(txtUser.Text);

    swSender.Flush();
// Start the thread for receiving messages and further communication
thrMessaging = new Thread(new ThreadStart(ReceiveMessages));
thrMessaging.Start();
}Nothing too complicated happens in there. The IP address is parsed from the TextBox into an IPAddress object, and then we open a TCP connection to that address. The port is 1986 but it makes no difference as long as its free. We then prepare the controls on the form by disabling some and enabling the others. We also change the caption of btnConnect to now say Disconnect. Through a stream, we then tell the server which username we want, and immediately after that we start a new thread that calls the method ReceiveMessages() which will listen for incoming messages from now on. By putting this in a separate thread, our application is still fully usable while it is listening for messages from the server and keeping the connection alive.
It’s time to see what the ReceiveMessages() method is all about:
private void ReceiveMessages()

{

    // Receive the response from the server

    srReceiver = new StreamReader(tcpServer.GetStream());

    // If the first character of the response is 1, connection was successful

    string ConResponse = srReceiver.ReadLine();

    // If the first character is a 1, connection was successful

    if (ConResponse[0] == '1')

    {

        // Update the form to tell it we are now connected

        this.Invoke(new UpdateLogCallback(this.UpdateLog), new object[] { "Connected Successfully!" });

    }

    else // If the first character is not a 1 (probably a 0), the connection was unsuccessful

    {
string Reason = "Not Connected: ";
// Extract the reason out of the response message. The reason starts at the 3rd character
Reason += ConResponse.Substring(2, ConResponse.Length - 2);
// Update the form with the reason why we couldn't connect
this.Invoke(new CloseConnectionCallback(this.CloseConnection), new object[] { Reason });
// Exit the method
return;
}
// While we are successfully connected, read incoming lines from the server
while (Connected)
{
// Show the messages in the log TextBox
this.Invoke(new UpdateLogCallback(this.UpdateLog), new object[] { srReceiver.ReadLine() });
}
}A new stream reader is hooked up to the TCP client. It will listen for incoming messages. But first of all, we read the first line coming from the server. The reason for that is that we know the first line contains a response telling us whether or not we connected successfully. Two reasons why we might’ve not connected successfully are if we attempted to use an username that is already taken, or if we attempted to use Administrator as the username, which is reserved for obvious purposes. The first character of the response given by the server tells us through a 1 that the connection was successful, and through a 0 if it was unsuccessful. And in that case, it also reads a reason as to why it was unsuccessful. That reason starts at the 3rd character of the message, since the first one is the number, and the second one is a pipe character. For example: 0|Username is already in use. Now you can see why if the first character is not a 1 we read the string that starts at the 3rd character and ends at the end of the line.
The this.Invoke() calls tell the form to update itself. We can’t directly update the form elements ourselves from this method because it’s in a separate thread (remember we called it using ThreadStart()) and cross-thread operations are illegal.
Finally, the while (Connected) loop keeps calling the srReceiver.ReadLine() method which checks for incoming messages from the server.
Next comes the method that we kept calling using this.Invoke() – all it does is to update the txtLog TextBox with the latest message:
// This method is called from a different thread in order to update the log TextBox

private void UpdateLog(string strMessage)

{

    // Append text also scrolls the TextBox to the bottom each time

    txtLog.AppendText(strMessage + "\r\n");

}
So far we’ve seen how to receive messages from the server, but nothing about how to send them. When do we want to send a message? When the Send button is clicked or when the Enter key is pressed while txtMessage has the focus. This should be hooked up to the Click event of the btnSend button:
// We want to send the message when the Send button is clicked

private void btnSend_Click(object sender, EventArgs e)

{

    SendMessage();

}
And this needs to be hooked up to the KeyPress event of txtMessage:
// But we also want to send the message once Enter is pressed

private void txtMessage_KeyPress(object sender, KeyPressEventArgs e)

{
    // If the key is Enter

    if (e.KeyChar == (char)13)

    {

        SendMessage();

    }

}
You can see that both of them make a call to SendMessage, which we are going to see next:
// Sends the message typed in to the server

private void SendMessage()

{

    if (txtMessage.Lines.Length >= 1)

    {

        swSender.WriteLine(txtMessage.Text);

        swSender.Flush();

        txtMessage.Lines = null;

    }

    txtMessage.Text = "";

}
Quite simple, isn’t it? It just checks for the number of lines to be greater or equal to 1, and then writes that line to the TCP connection through the StreamWriter object. Calling Flush() ensures that the messages are being sent right away.
We seem to be almost done with the client application. But let’s not forget that when btnConnect was clicked, if we were already connected, we called a method called CloseConnection() – what happened to that? Well here it is:
// Closes a current connection

private void CloseConnection(string Reason)

{

    // Show the reason why the connection is ending

    txtLog.AppendText(Reason + "\r\n");

    // Enable and disable the appropriate controls on the form

    txtIp.Enabled = true;

    txtUser.Enabled = true;

    txtMessage.Enabled = false;

    btnSend.Enabled = false;

    btnConnect.Text = "Connect";
 // Close the objects

    Connected = false;

    swSender.Close();

    srReceiver.Close();

    tcpServer.Close();

}
The form is being brought back to the not-connected state, and the TCP connection and streams are being closed. But what happens if the user doesn’t click Disconnect and just closes the application while the connection with the server is alive? We surely don’t want to leave the connection open like this till it dies by its own. Thankfully there is the ApplicationExit event that fires when the application closes, and that’s where we can close our connection. To hook up the event change your Form1 constructor to the following:
public Form1()

{

    // On application exit, don't forget to disconnect first

    Application.ApplicationExit += new EventHandler(OnApplicationExit);

    InitializeComponent();

}
And here is the event handler that does the actual disconnection:
// The event handler for application exit
public void OnApplicationExit(object sender, EventArgs e)
{
if (Connected == true)
{
// Closes the connections, streams, etc.
Connected = false;
swSender.Close();
srReceiver.Close();
tcpServer.Close();
}
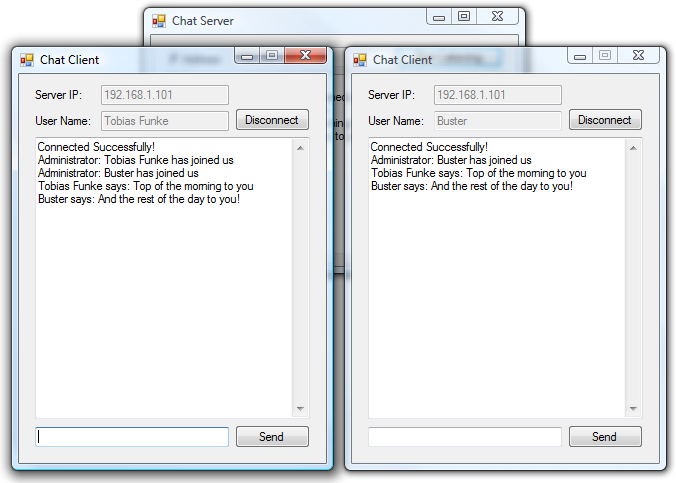
}Believe or not, we’re done with the chat client application. You should be able to compile and run it now, but of course there’s nothing to connect to because we haven’t developed the server. But that comes next in C# Chat: Part 2- Building the Chat Server. Here’s a little teaser of our applications in action, with the server in the shadow of the two: