This tutorial doesn't just show you how to make a simple drawing program, it also teaches you things like error handling. Good for beginners who want some hands-on approach.
Basic drawing program
This tutorial shows you how to make a simple drawing program and this way it also teaches you things like error handling.
Visual Basic is well known for making simple programs fast so this is what we’ll do now, a program that opens a bmp file, modifies it and saves it as a new bmp file.
As I said earlier, this tutorial doesn’t just show you how to use a brush to modify the content of a PictureBox. It also shows you other stuff, like handling errors so consider it a practical example for Visual Basic beginners.
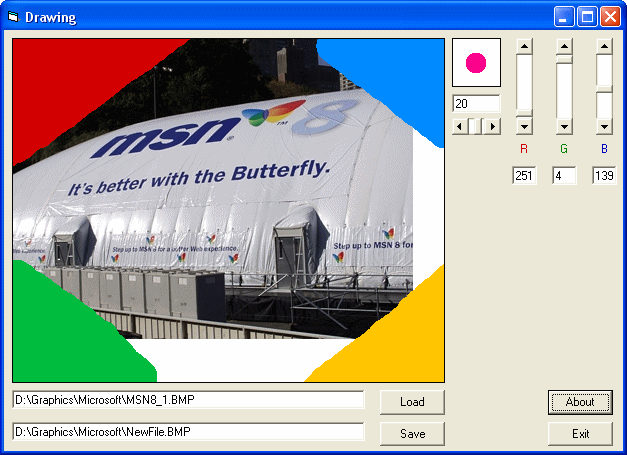
This is how the program looks (version 0.10). Even MS Paint is much more complex than this program, but for the VisualBasic beginner it is a good start.
You can find the vb project here. Download, run and then we’ll analyze the code.
The coding was done in VisualBasic 6.0 (from Visual Studio 6.0).
Dim drawingFirst we declare a variable in General Declaration, that will hold either ‘True’ or ‘False’, meaning ‘draw’ or ‘don’t draw’.
When we press the mouse button on the PictureBox, we want this variable to hold ‘True’ because we want the mouse cursor to leave a trail (brush).
When the mouse button isn’t pressed we want the variable to hold ‘False’ and ‘do not draw’.
We also want the variable to be set to ‘False’ at the program start, so we add this in Form Load:
Private Sub Form_Load()
drawing = False
End Sub
When we press the mouse button with the cursor on the PictureBox we want the mouse cursor to leave a trail (act like a brush).
This is why we set the ‘drawing’ variable to ‘True’ at pctMain_MouseDown:
Private Sub pctMain_MouseDown(Button As Integer, Shift As Integer, X As Single, Y As Single)
drawing = True
End Sub
Still, now the cursor doesn’t leave any trail because we didn’t decided what to do when the drawing variable is set to true:
Private Sub pctMain_MouseMove(Button As Integer, Shift As Integer, X As Single, Y As Single)
If drawing = True Then
pctMain.DrawWidth = HScrollBrushSize.Value
pctMain.ForeColor = RGB(VScrollRed, VScrollGreen, VScrollBlue)
pctMain.PSet (X, Y) // The coordinates - the current position of the cursor on the PictureBox
End If
End Sub
The moving of the cursor leaves a trail that has the width of ‘HScrollBrushSize.Value’ and the color set by the 3 ScrollBars (‘RGB(VScrollRed, VScrollGreen, VScrollBlue)’).
If the mouse button is released we should stop drawing. That is why we use:
Private Sub pctMain_MouseUp(Button As Integer, Shift As Integer, X As Single, Y As Single)
drawing = False
End Sub
We can change the size of the circle using either the ScrollBar or the TextBox.
For changing the size using the ScrollBar, the code is the following:
shpCurr.BorderWidth = HScrollBrushSize.Value
txtBrushSize.Text = HScrollBrushSize.Value
We increase the BorderWidth property of the shape to the value of the ScrollBar. We also update the alternative way to change the size of the circle, the TextBox.
Looks good, but the size changes only when we press the arrows of the ScrollBar. When we drag the slider on the ScrollBar, the shape doesn’t get bigger/smaller.
We fix this by calling the Sub from ‘HScrollBrushSize Scroll’, because when we slide we want everything to act the same as when we use the arrow buttons:
Private Sub HScrollBrushSize_Scroll()
HScrollBrushSize_Change
End Sub
Now we set up the alternative way for making the shape bigger/smaller, the TextBox:
Private Sub txtBrushSize_Change()
If txtBrushSize.Text > 30 Then
txtBrushSize.Text = 30
End If
HScrollBrushSize.Value = txtBrushSize.Text
End Sub
With ‘HScrollBrushSize.Value = txtBrushSize.Text’ we update the ScrollBar to the value from the TextBox.
What’s with the ‘If’ condition you ask? The ‘Max’ attribute of the ScrollBar is set to 30. This means we shouldn’t have a circle bigger than 30. If we insert a value bigger than 30, it will be reseted to the biggest possible value, 30.
‘VScrollRed’, ‘VScrollGreen’ and ‘VScrollBlue’ form a RGB value that changes the color of the brush.
Concerning the alternative use of the ‘TextBox’ for choosing a RGB value, they act similar to the ‘HScrollBrushSize’ and ‘txtBrushSize’. They change at the same time and support a maximum value of 255:
Private Sub VScrollRed_Change()
shpCurr.BorderColor = RGB(VScrollRed, VScrollGreen, VScrollBlue)
txtRVal.Text = VScrollRed.Value
End Sub
Instead of rewriting the code for ‘VScrollRed_Scroll()’ we can call the ‘VScrollRed_Change’ Sub:
Private Sub VScrollRed_Scroll()
VScrollRed_Change
End Sub
The same works for the other two:
Private Sub VScrollGreen_Change()
shpCurr.BorderColor = RGB(VScrollRed, VScrollGreen, VScrollBlue)
txtGVal.Text = VScrollGreen.Value
End Sub


Private Sub VScrollGreen_Scroll()
VScrollGreen_Change
End Sub


Private Sub VScrollBlue_Change()
shpCurr.BorderColor = RGB(VScrollRed, VScrollGreen, VScrollBlue)
txtBVal.Text = VScrollBlue.Value
End Sub


Private Sub VScrollBlue_Scroll()
VScrollBlue_Change
End Sub
When we click the ‘Load’ button we want to check if the path in ‘txtLoad’ is correct and if the file exists:
On Error GoTo LoadPicError
pctMain.Picture = LoadPicture(txtLoad.Text)
LoadPicError:
    Select Case Err.Number
    Case 53
        MsgBox "Path doesn't exist.", vbCritical, "Wrong path"
    Case 75
        MsgBox "File doesn't exist.", vbCritical, "Wrong file"
    End Select
When we load a file there can be two (or more) possible errors. If the path is incorrect, or if the path is correct, but the file doesn’t exist in the specified folder.
This is why we use ‘On Error GoTo LoadPicError’ – we tell the program if an error is found to go to the line with ‘LoadPicError:’.
There we have two cases of error number messages. If the error number (Err.Number) is 53, it means the path isn’t correct. If the error number is 75 it means the path is correct, but there is no file with that name.
At the save button we have the following code:
Private Sub cmdSave_Click()
On Error GoTo SavePicError
Set pctMain.Picture = pctMain.Image
SavePicture pctMain.Picture, txtSave.Text
SavePicError:
    Select Case Err.Number
    Case 76
        MsgBox "Path doesn't exist.", vbCritical, "Wrong path"
    End Select
End Sub
The same, if there happens to be an error, probably this would be because the path isn’t correct (the folder in which you selected to save the image doesn’t exist). And that error has the 76 number.
Warning! The file name must have the bmp extension. A good save path for example is ‘c:\newfile.bmp’
When you click on the ‘txtLoad’ TextBox the ‘Enter the path to the BMP file to load’ message disappears. If we leave the TextBox empty and select something else on the form (LostFocus), the text appears back. Though, if we write something in the TextBox and select something else on the form, the text doesn’t appear anymore.
This is done using:
Private Sub txtLoad_GotFocus()
If txtLoad.Text = "Enter the path to the BMP file to load" Then
txtLoad.Text = ""
End If
End Sub
and
Private Sub txtLoad_LostFocus()
If txtLoad.Text = "" Then
txtLoad.Text = "Enter the path to the BMP file to load"
End If
End Sub
This is the way it should because if we type a path in ‘txtLoad’ and click the ‘cmdLoad’ button, the TextBox would be reseted to ‘Enter the path to the BMP file to load’, and that’s not what we want to.
Therefore in the first piece of code (txtLoad_GotFocus()) we check to see if the TextBox contains the default text. If it does we reset it to “”, that means nothing, nada, blank…
When the ‘txtLoad’ TextBox loses focus we want to check it if it’s empty. If it’s empty, that means that the user didn’t type anything, and it’s safe to come back to the default message.
The same technique we use on ‘txtSave’:
Private Sub txtSave_GotFocus()
If txtSave.Text = "Enter the path where the BMP file will be saved" Then
txtSave.Text = ""
End If
End Sub
and
Private Sub txtSave_LostFocus()
If txtSave.Text = "" Then
txtSave.Text = "Enter the path where the BMP file will be saved"
End If
End Sub
Finally, in the ‘About’ ‘MsgBox’ we use a method to break the text into several lines:
MsgBox "Made by Andrei Pociu for Geekpedia" & vbCr & "[email protected]" & vbCr & vbCr & " Copyright (C) 2004 Geekpedia.com", vbOK + vbInformation, "About Drawing"‘vbOK + vbInformation’ is the type of ‘MsgBox’ we want, one with an OK button and vbInformation icon.
If this tutorial will get a high rate maybe it will continue with a part II, where you’ll learn how to make your program draw shapes and other things 😉


