
In this tutorial we're going to use the new namespace of .NET 2.0, System.IO.Compression, which will give us access to the GZipStream class which will then allow us to compress and decompress ZIP files.
The GZipStream class Before .NET Framework 2.0 if you wanted to compress files you had to use a 3rd party library capable of doing that. In the new version there is a new namespace: System.IO.Compression that contains the GZipStream class. The GZipStream class has methods allowing us to both compress and decompress a file into a zip archive.
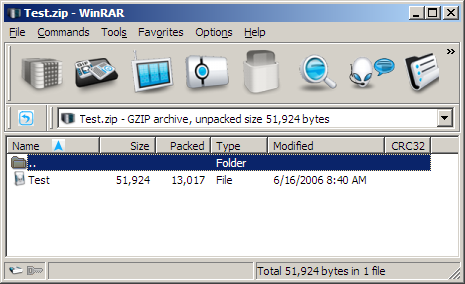
The disadvantage of using the GZipStream class over a 3rd party product is that it has limited capabilities. One of the limitations is that you cannot give a name to the file that you place in the archive. When GZipStream compresses the file into a ZIP archive, it takes the sequence of bytes from that file and uses compression algorithms that create a smaller sequence of bytes. The new sequence of bytes is put into the new ZIP file. When you open the ZIP file you will open the archived file itself; most popular ZIP extractors (WinZip, WinRar, etc.) will show you the content of the ZIP as a file that has the same as the archive itself:
This is because the GZipStream class does not specify a file name in the headers, as metadata, since in the specifications of the GZIP file format, declaring a name is optional. This may not bother you if you are using this class to compress files used by your application (such as archiving old documents) and when the usage of the GZipStream class comes just a single piece of the puzzle in a larger application.
On the other hand, if you’re looking to build an application that has the solely purpose of zipping and unzipping files, you will encounter some of GZipStream’s limitations. If you decide to use a 3rd party class library in that case, or if you prefer to stick to GZipStream, is your choice. There is a workaround for giving file names to the ZIPs content by modifying the headers yourself. For information on how to change the headers, please see the MSDN Magazine article entitled NamedGZipStream, Covariance and Contravariance.
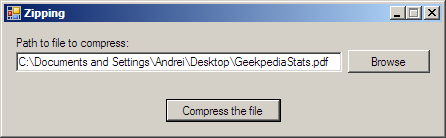
Zipping (sample application) Let’s start by creating a new Windows application project into Visual Studio 2005. Add to the form a TextBox and two Buttons. The TextBox is entitled txtPath and it will hold the path to the file to compress. The Buttons are entitled btnBrowse and btnCompress. The first one will show an OpenFileDialog for picking a file to compress, and the second one – btnCompress – will show a SaveFileDialog followed by the actual compressing and saving process. Speaking of these two dialogs, make sure you add them to our application and name them openFile and saveFile.
The two important namespaces we’ll use need to be added at the top of the class file so we don’t have to write really long lines:
using System.IO;
using System.IO.Compression;
Now double click btnBrowse and its Click event will be created. Inside it use the following code that displays the OpenFileDialog and allows the user to pick a file:
// Show the dialog where the user chooses the file to compress
if (openFile.ShowDialog() == DialogResult.OK)
{
txtPath.Text = openFile.FileName;
}
Now that we got the path, it’s time to take that file and compress it. This happens when the user clicks on the btnCompress button, thus double-click it to get to its Click event and inside use the following code:
// If the user has selected a path where to put the compressed file
if (saveFile.ShowDialog() == DialogResult.OK)
{
// Bytes array in which we're going to store the actual file to be compressed
byte[] bufferWrite;
// Will open the file to be compressed
FileStream fsSource;
// Will write the new zip file
FileStream fsDest;
GZipStream gzCompressed;
fsSource = new FileStream(txtPath.Text, FileMode.Open, FileAccess.Read, FileShare.Read);
// Set the buffer size to the size of the file
bufferWrite = new byte[fsSource.Length];
// Read the data from the stream into the buffer
fsSource.Read(bufferWrite, 0, bufferWrite.Length);
// Open the FileStream to write to
fsDest = new FileStream(saveFile.FileName, FileMode.OpenOrCreate, FileAccess.Write);
// Will hold the compressed stream created from the destination stream
gzCompressed = new GZipStream(fsDest, CompressionMode.Compress, true);
// Write the compressed stream from the bytes array to a file
gzCompressed.Write(bufferWrite, 0, bufferWrite.Length);
// Close the streams
fsSource.Close();
gzCompressed.Close();
fsDest.Close();
}
Hopefully the comments will explain the code to you entirely; as you can see we don’t have any room for error in this code for obvious reasons (keeping it simple and easy to comprehend), therefore in a production version you will probably want to catch exceptions and validate the user’s input.
Your application should now look such as the one attached to this tutorial:
Now that you know the basics of compressing files using .NET Framework 2.0, let’s see how you can decompress files in the next tutorial: Unzipping compressed files using GZipStream.


