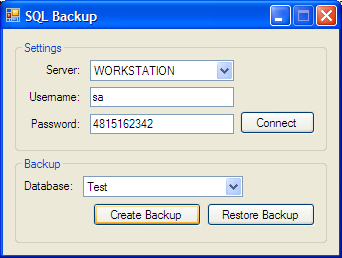
Programming tutorial that shows you how to backup a SQL database to a BAK file and then restore it from the same file using C#. First we list all running SQL Server 2005 instances, then we connect to one of them and retrieve all the databases from that server, finally we create the backup and restore operations; everything is done using SQL Management Objects (SMO).

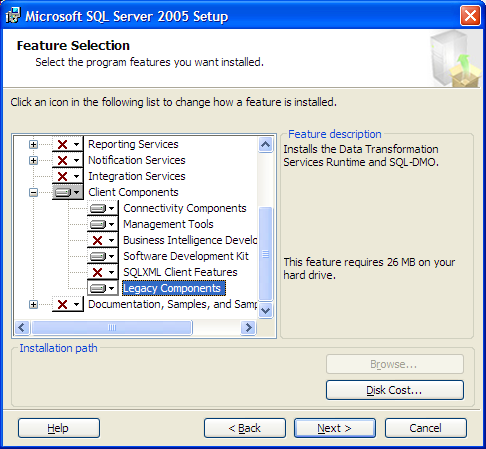
The application we’re going to create here will only work with SQL Server 2005, since we’ll be using SQL Management Objects (SMO) which were introduced in this new version of SQL: 2005. If you would like to create a backup application like the one we are creating here, but you want to make it work with both SQL Server 2005 and older versions of SQL Server – such as 2000 – you should use SQL-DMO instead of SMO. However, for your application to work in SQL Server 2005, when setting up the server you will need to install the Legacy Components, as shown in the screenshot below:

Since in this tutorial we’ll be using SQL SMO only, there’s no need to install anything extra aside from the typical SQL Server 2005 setup.
Let’s start building the C# application in Visual Studio 2005.
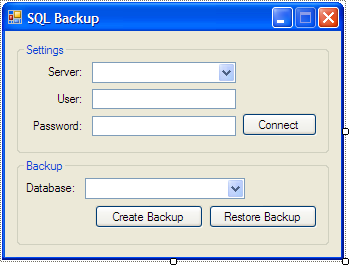
Start by creating a new Windows Form application, and design a form such as the one below:

If we ignore the labels on the form, which are not crucial for the application, in the first groupbox we have 4 controls: cmbServer, txtUsername, txtPassword and btnConnect. In the second groupbox we have 3 controls: cmbDatabase, btnCreate and btnRestore. It should be easy for you to figure which one’s which, but there’s also the Visual Studio project attached to this tutorial if you need help.
There’s two more things we need to add: an OpenFileDialog and a SaveFileDialog entitled openBackupDialog and saveBackupDialog.

These two will be used for opening the backup file and restoring it, and for saving the backup file to a location on the hard drive.
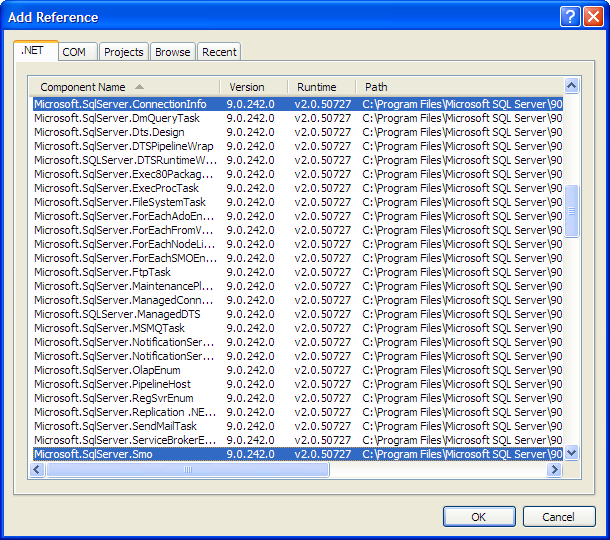
Adding Microsoft.SqlServer references to our project Right click your project and choose “Add Reference”. In the .NET tab you should see multiple Microsoft.SqlServer objects. We are interested in only two of them, Microsoft.SqlServer.ConnectionInfo and Microsoft.SqlServer.Smo, as shown in the screenshot below. If you don’t see these objects in the list, you probably don’t have SQL Server 2005 installed on the system where you are developing this application.

Now that you added the two references to the project we are ready to code.
Switch to code view, and let’s start by adding the using statement for the SQL namespaces we’re going to use. Add the following two lines after the already existent using statements.
using Microsoft.SqlServer.Management.Smo;

using Microsoft.SqlServer.Management.Common;
Most of the objects we’re going to use in this tutorial will have a local scope, they will only be used in a specific method or event, so we’ll create them on spot. But one of these objects needs to be declared directly inside the class, and this is the Server object, part of Microsoft.SqlServer.Management.Smo. The reason is that we’re going to verify this object to see if a connection to a server has been made, in several events.
Before writing the code that executes the backup, the first thing we need to do is to connect to the database; the controls in the first group box will be used for doing that. But even before we add functionality to the “Connect” button, there’s one other thing we need to do: populate the “Server” combobox with the servers available on the user’s machine.
Getting a list of available SQL Servers As I said, the very first thing we need to do is to populate the combobox cmbServer with the available SQL servers when the application (and thus the form) is loading. Therefore, doubleclick the titlebar of the form in Visual Studio’s Form Designer and you will get to the Load event of the form (Form1_Load). Inside this event, use the following code:
// Create a DataTable where we enumerate the available servers

DataTable dtServers = SmoApplication.EnumAvailableSqlServers(true);

// If there are any servers at all

if (dtServers.Rows.Count > 0)

{

   // Loop through each server in the DataTable

   foreach (DataRow drServer in dtServers.Rows)

   {

      // Add the name to the combobox

      cmbServer.Items.Add(drServer["Name"]);

   }

}
In the code above we are using EnumAvailableSqlServers() to get a list of servers that we then loop through. The true parameter that we are passing to EnumAvailableSqlServers() tells it to list only the local SQL Server instances, and not the ones on the network. Why would we want to do that? Because as far as I know, there is no way to remotely backup the SQL Server and save the file to the remote computer. You can backup remotely, but the file must be saved on the same computer as where the server is running. Of course, if you want to develop this type of functionality, you can always write the code to save the file on the server and then download it to the remote computer.
You can now compile and run the SQL Backup application, and after it loads you should see a list of servers in the cmbServer combobox. If you have one instance of SQL Server 2005 installed typically, you should see one server that has the same name as your computer.
Connecting to SQL Server Now that we got the server list, let’s take care of connecting to one of the servers in that list. And that will happen when the “Connect” (btnConnect) button is clicked. Along with connecting, we’re also going to retrieve a list of databases from that server.
Thus, inside the Visual Studio form designer, double click the btnConnect button and the Click event will be automatically created. Inside it, use the following code:
// If a server was selected at all from the combobox

if (cmbServer.SelectedItem != null && cmbServer.SelectedItem.ToString() != "")

{

   // Create a new connection to the selected server name

   ServerConnection srvConn = new ServerConnection(cmbServer.SelectedItem.ToString());

   // Log in using SQL authentication instead of Windows authentication

   srvConn.LoginSecure = false;

   // Give the login username

   srvConn.Login = txtUsername.Text;

   // Give the login password

   srvConn.Password = txtPassword.Text;

   // Create a new SQL Server object using the connection we created

   srvSql = new Server(srvConn);

   // Loop through the databases list

   foreach (Database dbServer in srvSql.Databases)

   {

      // Add database to combobox

      cmbDatabase.Items.Add(dbServer.Name);

   }

}

else


{

   // A server was not selected, show an error message

   MessageBox.Show("Please select a server first", "Server Not Selected", MessageBoxButtons.OK, MessageBoxIcon.Exclamation);

}
In the code above, before taking any serious action we check to see if a server was selected from the combobox. If a selection was made, we create a ServerConnection object to connect to the selected server. We don’t use Windows Authentication for the server, thus we set LoginSecure to false. This requires that we log in to the SQL server using an username and a password. If the Windows account that we were running this application from had SQL Server credentials, and the server accepted Windows Authentication, we could set LoginSecure to true and there wouldn’t be a need to provide a login and a password. However, using SQL Authentication instead of Windows Authentication normally increases the chances of a successful connection.
After we successfully connect, we assign the Server object and loop through each database so that we can add it to the combobox.
At this point, if you compile the application and connect to the SQL server with the appropriate credentials, you should see a list of databases in the combobox. Now all that’s left to do is to backup and restore the selected database.
How to backup a SQL database What you should do at this step is to double click the Create Backup button in the form designer, and you will get to the Click event of btnCreate where you need to use the following code:
// If there was a SQL connection created

if (srvSql != null)

{

   // If the user has chosen a path where to save the backup file

   if (saveBackupDialog.ShowDialog() == DialogResult.OK)

   {

      // Create a new backup operation

      Backup bkpDatabase = new Backup();

      // Set the backup type to a database backup

      bkpDatabase.Action = BackupActionType.Database;

      // Set the database that we want to perform a backup on

      bkpDatabase.Database = cmbDatabase.SelectedItem.ToString();


      // Set the backup device to a file

      BackupDeviceItem bkpDevice = new BackupDeviceItem(saveBackupDialog.FileName, DeviceType.File);

      // Add the backup device to the backup

      bkpDatabase.Devices.Add(bkpDevice);

      // Perform the backup

      bkpDatabase.SqlBackup(srvSql);

   }

}

else

{

   // There was no connection established; probably the Connect button was not clicked

   MessageBox.Show("A connection to a SQL server was not established.", "Not Connected to Server", MessageBoxButtons.OK, MessageBoxIcon.Exclamation);

}
First we check to see if a connection was made, then we prompt the user to choose a path where he wants to save the backup file (BAK extension). The backup object is then created and a few properties are set to define a few required values. As you probably well know, a backup can be made to an external device such as tapes, or ZIP drives, but here we choose to save the backup to a file.
Right now, you should be able to compile this project and perform a backup on one of your databases. The backup file that is now created, is ready to be restored.
How to restore a SQL database from a backup Restoring a database from a previously created BAK file is similar to creating a backup, instead that of a Backup object we use a Restore object. Double click the Restore button (btnRestore) to get the Click event created, and inside it use the following code:
// If there was a SQL connection created

if (srvSql != null)

{

   // If the user has chosen the file from which he wants the database to be restored

   if (openBackupDialog.ShowDialog() == DialogResult.OK)

   {

      // Create a new database restore operation

      Restore rstDatabase = new Restore();

      // Set the restore type to a database restore

      rstDatabase.Action = RestoreActionType.Database;

      // Set the database that we want to perform the restore on

      rstDatabase.Database = cmbDatabase.SelectedItem.ToString();


      // Set the backup device from which we want to restore, to a file

      BackupDeviceItem bkpDevice = new BackupDeviceItem(openBackupDialog.FileName, DeviceType.File);

      // Add the backup device to the restore type

      rstDatabase.Devices.Add(bkpDevice);

      // If the database already exists, replace it

      rstDatabase.ReplaceDatabase = true;

      // Perform the restore

      rstDatabase.SqlRestore(srvSql);

   }

}

else

{

   // There was no connection established; probably the Connect button was not clicked

   MessageBox.Show("A connection to a SQL server was not established.", "Not Connected to Server", MessageBoxButtons.OK, MessageBoxIcon.Exclamation);

}
In the code above we are restoring the database from a backup device that we specify – which is a file, of course – and the name of the database that we want to restore to is also specified. Currently it is being restored to the database selected in the combobox, however that is not necessary because as implied by the ReplaceDatabase property, a database doesn’t have to exist for the restore operation to work. This means that in the real-life application you’ll be building, you will allow the user to specify the name of the database to restore to, and if it doesn’t exist, it will be automatically created.
Moreover, before developing a real-life application you should know that the Microsoft.SqlServer namespace offers numerous classes, methods and properties that you can use to improve the code that we wrote here. This code was limited to just showing you, the reader, how to list all SQL Server 2005 instances, connect to one of them using SQL Authentication, retrieve a list of databases and perform backup / restore operations on these databases. However, there are many ways to improve your application; one of the first things you’ll want to do is to implement a strong error prevention and handling system, since the current code only barely deals with errors.
It should be easy for you to extend the current code so that you can add new features to your application, such as a progress bar that shows how much of the backup or restoration was performed. Thanks to the Microsoft.SqlServer namespace, these features are very easy to develop, and perhaps a future tutorial will follow, where we will build a more advanced SQL Server backup application.
Below is the entire code of Form1.cs for our application, in case you want to have an overall look:
using System;

using System.Collections.Generic;

using System.ComponentModel;

using System.Data;

using System.Drawing;

using System.Text;

using System.Windows.Forms;

using Microsoft.SqlServer.Management.Smo;

using Microsoft.SqlServer.Management.Common;


namespace SqlBackUp

{

    public partial class Form1 : Form


    {

        private static Server srvSql;


        public Form1()

        {

            InitializeComponent();

        }


        private void Form1_Load(object sender, EventArgs e)

        {

            // Create a DataTable where we enumerate the available servers

            DataTable dtServers = SmoApplication.EnumAvailableSqlServers(true);

            // If there are any servers at all

            if (dtServers.Rows.Count > 0)

            {

                // Loop through each server in the DataTable

                foreach (DataRow drServer in dtServers.Rows)

                {

                    // Add the name to the combobox

                    cmbServer.Items.Add(drServer["Name"]);

                }

            }

        }


        private void btnConnect_Click(object sender, EventArgs e)

        {

            // If a server was selected at all from the combobox

            if (cmbServer.SelectedItem != null && cmbServer.SelectedItem.ToString() != "")

            {

                // Create a new connection to the selected server name

                ServerConnection srvConn = new ServerConnection(cmbServer.SelectedItem.ToString());

                // Log in using SQL authentication instead of Windows authentication

                srvConn.LoginSecure = false;

                // Give the login username

                srvConn.Login = txtUsername.Text;

                // Give the login password

                srvConn.Password = txtPassword.Text;

                // Create a new SQL Server object using the connection we created

                srvSql = new Server(srvConn);

                // Loop through the databases list

                foreach (Database dbServer in srvSql.Databases)

                {

                    // Add database to combobox

                    cmbDatabase.Items.Add(dbServer.Name);

                }

            }

            else

            {

                // A server was not selected, show an error message

                MessageBox.Show("Please select a server first", "Server Not Selected", MessageBoxButtons.OK, MessageBoxIcon.Exclamation);

            }

        }


        private void btnCreate_Click(object sender, EventArgs e)

        {

            // If there was a SQL connection created

            if (srvSql != null)

            {

                // If the user has chosen a path where to save the backup file

                if (saveBackupDialog.ShowDialog() == DialogResult.OK)

                {

                    // Create a new backup operation

                    Backup bkpDatabase = new Backup();

                    // Set the backup type to a database backup

                    bkpDatabase.Action = BackupActionType.Database;

                    // Set the database that we want to perform a backup on

                    bkpDatabase.Database = cmbDatabase.SelectedItem.ToString();


                    // Set the backup device to a file

                    BackupDeviceItem bkpDevice = new BackupDeviceItem(saveBackupDialog.FileName, DeviceType.File);

                    // Add the backup device to the backup

                    bkpDatabase.Devices.Add(bkpDevice);

                    // Perform the backup

                    bkpDatabase.SqlBackup(srvSql);

                }

            }

            else

            {

                // There was no connection established; probably the Connect button was not clicked

                MessageBox.Show("A connection to a SQL server was not established.", "Not Connected to Server", MessageBoxButtons.OK, MessageBoxIcon.Exclamation);

            }

        }


        private void btnRestore_Click(object sender, EventArgs e)

        {

            // If there was a SQL connection created

            if (srvSql != null)

            {

                // If the user has chosen the file from which he wants the database to be restored

                if (openBackupDialog.ShowDialog() == DialogResult.OK)

                {

                    // Create a new database restore operation

                    Restore rstDatabase = new Restore();

                    // Set the restore type to a database restore

                    rstDatabase.Action = RestoreActionType.Database;

                    // Set the database that we want to perform the restore on

                    rstDatabase.Database = cmbDatabase.SelectedItem.ToString();


                    // Set the backup device from which we want to restore, to a file

                    BackupDeviceItem bkpDevice = new BackupDeviceItem(openBackupDialog.FileName, DeviceType.File);

                    // Add the backup device to the restore type

                    rstDatabase.Devices.Add(bkpDevice);

                    // If the database already exists, replace it

                    rstDatabase.ReplaceDatabase = true;

                    // Perform the restore

                    rstDatabase.SqlRestore(srvSql);

                }

            }

            else

            {

                // There was no connection established; probably the Connect button was not clicked

                MessageBox.Show("A connection to a SQL server was not established.", "Not Connected to Server", MessageBoxButtons.OK, MessageBoxIcon.Exclamation);

            }

        }

    }

}


