This tutorial will demonstrate the process of setting up a database connection in Macromedia Dreamweaver MX 2004.
Click on the icon to the left to run the Video Tutorial (Flash Animation). Or you may download it in ZIP format by clicking here.
To view this tutorial in Macromedia FlashPaper Format, click here (Opens in a new window…)
This tutorial will demonstrate the process of setting up a database connection in Macromedia Dreamweaver MX 2004. The database that I will be using for this tutorial is an Access Database. I will use the DSN-Less approach to connect to the database since not all ISPs favour the DSN approach for setting up database connections.
SETUP DATABASE:
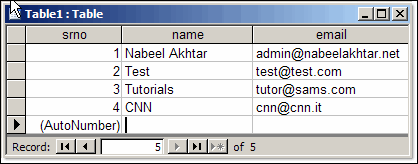
So before we dig in, lets setup our Access Database. I will create a database in C:\test\test.mdb. Here is how my database looks like:

Notice that the “srno” field is assigned the primary key. The name of this table is “Table 1”. Lets go ahead and add some data to this database.

Now let’s save the database and set Read permissions for the IUSR_xxx account. These permissions have to be set be
START DREAMWEAVER:
Let’s open up Dreamweaver and go to File > New > Dynamic Page > ASP VBScript > Create. Once the file is created, save it under your webroot location. I have saved the file as “dmx_db.asp”. Now the fun begins…
Open the Databases panel (Window > Databases)
Click the Plus (+) button on the panel and select Custom Connection String from the pop-up menu.
The Custom Connection String dialog box appears.
Complete the dialog box as follows:

In the Connection name, type conn. This will be the name of your database connection (it could be anything you want)
In the Connection string, type
Driver={Microsoft Access Driver (*.mdb)}; DBQ=C:\test\test.mdb
The DBQ sets the location of the database. Your location may vary. If you have assigned a password to the database then use
Driver={Microsoft Access Driver (*.mdb)}; DBQ=C:\test\test.mdb; pwd=your_passwd
Now click on the Test button to make sure that everything is going fine.

If you see the above window, it means everything is going fine. However if you don’t see the above window, you need to restart and follow the explained process.
Now under the database tab you should be able to see the “conn” connection that you just created. Expand the tabs and you should be able to see the table and the column names that were previously created in the database.

CONNECT DATABASE WITH A DYNAMIC DROP-DOWN LIST:
Now that we have the database in place, we can now connect any of the HTML input fields to the database. To start this process, the first thing that we have to do is to create a Recordset. The Recordset will hold the values returned from a SQL Query and then the resulting fields can be used to populate a drop-down list.
The Recordset will be defined in the Bindings Window (Window > Bindings). Click the + sign and choose Recordset (Query). A new window will pop-up. Fill in the details as shown below and click on OK:

Once completed, you will see a Recordset entry in the Bindings window. Now it’s time to create an input field and assign this recordset to our HTML field.
![]() Create a Form Region
Create a Form Region
![]() and then create a List/Menu
and then create a List/Menu
Click on the List/Menu to select it and then click on “Dynamic…”

Fill in the details as shown below and save your work:

TRY IT OUT
Now open up your browser, and type in the URL to the page you just created. When the page comes up, the drop-down list will be populated with the names stored in the database.
Thats all… and remeber, the possibilities are endless. You can customize your query and filter records based on your need.
Happy programming.
Update: Please note that the website NabeelAkhtar.NET, previously referenced in this article, is no longer active as of 28/11/2023. We apologize for any inconvenience and are working to update the content with alternative resources. Thank you for your understanding.
If you need to contact us, please visit: http://www.nabeelakhtar.net/contact/
Nabeel Akhtar
http://www.nabeelakhtar.net


