This tutorial will show you the code you need to write to have your application create shortcuts to any path (the desktop, startup folder, etc.).
Creating a shortcut from within a C# Windows application is not as easy as using a method in a namespace of the .NET framework. However, after you’ll be reading this tutorial, you’ll find that it’s not rocket science either. For testing purposes, you can create a Windows Forms applications, and add a button on it: btnShortcut. Double-clicking the button will bring you to the btnShortcut_Click event, where we will write some lines of code that will actually create the shortcut.
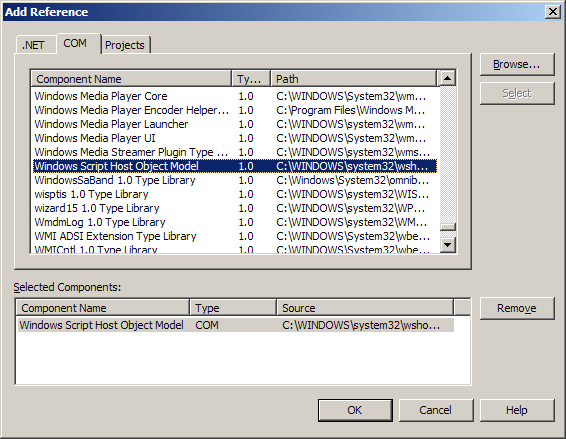
But before that, we need to add a reference to Windows Script Host Object Model. To do that, right-click the “References” folder in Solution Explorer and choose “Add Reference”. From the COM tab, choose Windows Script Host Object Model. Double click it, and it will be added to the “Selected Components” list:

Now click OK and let’s get to coding. You can see in the Solution Explorer that we know have IWshRuntimeLibrary added. So we don’t have to write long lines of code, let’s add a “using” directive in the Form1.cs file:
using IWshRuntimeLibrary;Next we shall create WshShell, an object of type WshShellClass:
private WshShellClass WshShell;Now inside the “click” event of the button, we do the coding:
private void btnShortcut_Click(object sender, System.EventArgs e)

{

// Create a new instance of WshShellClass

WshShell = new WshShellClass();
// Create the shortcut

IWshRuntimeLibrary.IWshShortcut MyShortcut;


// Choose the path for the shortcut

MyShortcut = (IWshRuntimeLibrary.IWshShortcut)WshShell.CreateShortcut(@"C:\MyShortcut.lnk");


// Where the shortcut should point to

MyShortcut.TargetPath = Application.ExecutablePath;


// Description for the shortcut

MyShortcut.Description = "Launch My Application";


// Location for the shortcut's icon

MyShortcut.IconLocation = Application.StartupPath + @"\app.ico";


// Create the shortcut at the given path

MyShortcut.Save();

}
Notice that we choosed the path to the current application, as the TargetPath, but you can set the shortcut to point to any file you want:
MyShortcut.TargetPath = @"C:\Program Files\Microsoft Visual Studio 8\Common7\IDE\devenv.exe";The description of the shortcut is also shown when in the tooltip, when the cursor is over the icon.
Currently, we set the location of the icon for the shortcut to app.ico, located inside the project’s Debug folder (Application.StartupPath). app.ico is included in the project.
However, you can always change the path for the icon to something like:
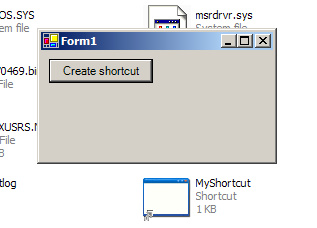
MyShortcut.IconLocation = @"C:\Program Files\Microsoft Office\OFFICE11\REFBAR.ICO";If you download and run the project, it will create a shortcut to itself (the executable inside bin\Debug directory) in C:\, as can be seen here:


